
Planting
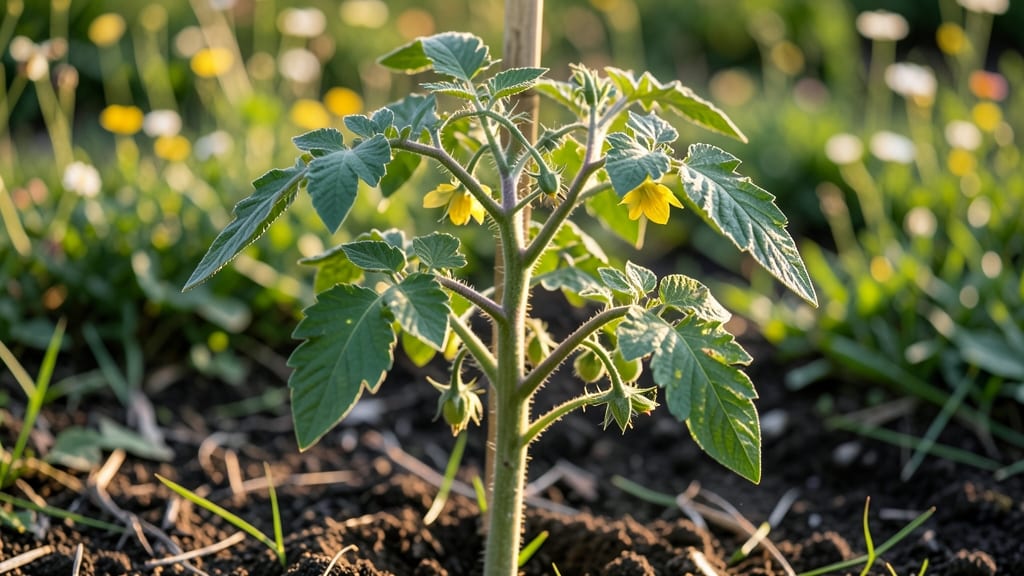
Your 8-week-old tomato plant is at the perfect stage to transform from a scraggly seedling into a bushy, productive powerhouse—if you prune it right. ✂️ I’ve pruned hundreds of tomato plants, and the ones that get this step right produce 2-3 times more fruit than the ones that don’t. The key?
Pruning for airflow, not just size, to prevent disease and encourage strong stems where those juicy tomatoes will form.
Leggy growth and root-bound roots are the biggest red flags at this stage. If your plant looks like a tall, skinny stalk with sparse leaves, it’s begging for a pruning session.
Start by snipping off the lower leaves that touch the soil—this keeps the plant healthy and prevents soil-borne diseases from creeping up.
For indeterminate varieties (the vining types), focus on removing suckers (those little shoots between the main stem and branches) to direct energy into fruit production, not extra foliage.
You’ll see the difference in just 2-3 weeks: thicker stems, more leaves, and—most exciting—bigger, healthier blossoms. The plants I’ve pruned this way have supported pounds of tomatoes by late summer, while neglected ones barely produced a handful.
The secret? Prune in the morning when the plant is turgid (full of water), and always use clean, sharp shears to avoid tearing the stems.
This works for both determinate (bush) and indeterminate (vining) tomatoes, though the pruning approach differs slightly. For bush types, prune lightly to shape; for vining types, go aggressive to encourage vertical growth.
Either way, you’ll end up with a plant that looks like a jungle—but in the best way possible. Let’s get those shears out and start shaping that harvest!
📚 In This Guide
- What you need
- Instructions
- Tips and common mistakes
- Wrapping up and next steps
What you need
- ● Pruning shears or sharp scissors: Clean, sterilized tools (avoid dull blades—they crush stems!).
- ● Gloves: Garden gloves (to protect from thorns and dirt).
- ○ Disinfectant (optional but recommended): Rubbing alcohol (70%+) or hydrogen peroxide (3%) to sterilize tools between cuts.
- ● Compost or mulch: 1–2 gallons (for post-pruning soil enrichment).
- ● Stake or support system (if needed): Bamboo stakes, tomato cages, or trellis (if your plant is tall or leggy).
- ● Watering can or hose: With a gentle spray nozzle (to hydrate after pruning).
- ● Plant growth regulator (e.g., Seaweed extract or copper fungicide): For extra vigor or disease prevention.
- ● Garden twine: For securing vines to stakes if your plant is sprawling.
- ● Notebook & pen: To track pruning dates and plant progress!
- ● Sunhat & sunscreen: Because even tomato lovers need shade breaks!
Step-by-Step pruning guide for your 8-Week-old tomato plant
Here’s how to transform a leggy, weak tomato plant into a sturdy, high-yielding bush within weeks.
🌱 Step 1: Identify and Remove the Suckers
Suckers are the small shoots that form in the leaf axils—the spot where a leaf meets the stem. These are your plant’s attempt to create a second main stem, but they divert energy from fruit production. Use your thumb and forefinger to gently pinch them off at the base, ensuring you don’t tear the stem. I always start with the suckers closest to the main stem first, working my way upward.
If a sucker is too large to pinch by hand, use clean, sharp pruning shears to cut it off just above the leaf axil. This prevents disease from entering the wound. Wait until the plant is dry to prune—wet stems are more prone to infection. You’ll know you’re doing it right when the plant’s energy shifts from vertical growth to thickening the main stem and producing more flowers.
✂️ Step 2: Prune Lower Leaves for Airflow and Light
Remove any leaves that touch the soil or hang below the first flower cluster. These leaves block airflow, trap moisture, and create ideal conditions for fungal diseases like blight. Use your fingers to gently twist off lower leaves—no need for shears here. Start with the oldest leaves at the base and work your way up, leaving only the top third of the plant bare if it’s particularly leggy.
This might seem drastic, but it’s essential. The goal is to direct the plant’s energy upward and improve light penetration to the lower fruit. You’ll notice within a week that new leaves emerge lower on the stem, creating a more balanced canopy. If your plant is still small, you can hold off on this step until it reaches about 2 feet tall.
☀️ Step 3: Encourage Bushier Growth with Strategic Pruning
Once your plant has 3-4 main stems (if you’re growing an indeterminate variety), choose the strongest one to keep as the primary stem. Remove the others at the base with clean shears. This might sound harsh, but it forces the plant to focus its energy on one strong structure rather than splitting its resources. For determinate varieties, which grow in a bush shape, you’ll only need to remove suckers and lower leaves—no need to prune the main stem.
After pruning, step back and assess the plant’s shape. You’re aiming for a balanced, open structure with plenty of airflow. If the plant looks top-heavy, you can also trim back the top by a few inches to encourage lateral branching. This is especially useful if your plant has grown too tall too quickly, which often happens in low-light conditions.
💧 Step 4: Support and Monitor Post-Pruning
After pruning, water the plant deeply to help it recover. The roots will need to adjust to the sudden shift in energy flow, and a good soak ensures they stay hydrated. Avoid fertilizing immediately—let the plant focus on regrowing leaves and strengthening its structure for at least a week. Once new growth appears, you can resume feeding with a balanced fertilizer to support the increased demand.
Keep an eye on the plant in the days following pruning. You might see a slight slowdown in growth as it recalibrates, but this is normal. Within 10-14 days, you should notice new shoots forming at the leaf axils and a more compact, bushy appearance. This is your signal that the pruning worked. If you see yellowing leaves or wilting, it could indicate stress—reduce watering slightly and ensure the plant is getting enough light.
Tips & tricks for perfect tomato plant pruning
Transforming a leggy tomato plant into a productive powerhouse takes a few key tricks—here's what I've learned after years of trial and error.
Timing is Everything: The 10-14 day recovery window mentioned in Step 4 is your plant's critical adjustment period. This isn't just waiting—it's when your plant decides whether to become bushier or revert to its leggy ways. If you see new shoots forming within this time, you're on the right track. If not, your plant might need more light or a slight temperature increase to kickstart growth. I've found that plants in cooler environments (below 65°F) often need an extra 3-5 days to show signs of recovery.
Tool Precision Matters: Those clean, sharp pruning shears from Step 1 aren't just about cutting—they're about making clean wounds that heal properly. I always sterilize my shears with rubbing alcohol between cuts to prevent disease transmission. For suckers that are too small to see clearly, I use a small hand lens (magnification 2-3x) to identify them before they become problematic. This simple tool has saved me from dealing with multiple unwanted stems later.
Visual Growth Cues: When assessing your plant's shape in Step 3, look for these visual signals: healthy main stems should have a slight upward angle with leaves spaced about 6-8 inches apart. If you see leaves growing too close together, that's your plant's way of telling you it needs more light. For indeterminate varieties, I aim to keep the plant's height within 3-4 feet of my support structure—any taller and it becomes top-heavy and prone to snapping in wind.
Post-Pruning Care Secret: That deep watering in Step 4 isn't just hydration—it's a signal to your plant that it's time to focus on recovery. I've found that watering in the early morning (before 10am) gives roots maximum time to absorb moisture before evening evaporation. For container-grown plants, I add a handful of compost to the soil surface after watering to provide immediate nutrients during this critical recovery period.
Pro Tips for 8 Week Old Tomato Plant
- Transforming a leggy tomato plant into a productive powerhouse takes a few key tricks—here's what I've learned after ...
- Timing is Everything: The 10-14 day recovery window mentioned in Step 4 is your plant's critical adjustment period. T...
- Tool Precision Matters: Those clean, sharp pruning shears from Step 1 aren't just about cutting—they're about making ...
Frequently asked questions
Got questions about your 8-week-old tomato plant? You’re not alone! Here are some of the most common concerns—and quick answers to keep your plant thriving:
Should I prune my 8-week-old tomato plant yet?
Not quite! Wait until your plant has at least 12-14 inches of height and 4-6 true leaves before pruning. Early pruning can stress young plants. Focus on removing suckers (side shoots) once the plant is sturdy enough—usually around 6-8 weeks after transplanting (so now’s your window!).
How do I know if I’m pruning correctly?
Look for suckers—those small shoots growing in the V-shaped junction between the main stem and a branch. Snip these off just above the leaf where they emerge. Avoid over-pruning: indeterminate varieties (like Roma or Beefsteak) need more pruning than determinate types (like Bush Early Girl), which rarely require it.
What if my tomato plant looks leggy after pruning?
Leggy growth is normal post-prune! Boost recovery by ensuring 6-8 hours of sunlight daily and watering at the base (not the leaves) to avoid fungal issues. Add a balanced fertilizer (10-10-10) to encourage bushier growth. If growth stalls, check for pests like aphids or spider mites—treat with neem oil if needed.
Can I prune tomato plants too much?
Over-pruning can reduce fruit production by removing too many leaves (which create energy via photosynthesis). For indeterminate tomatoes, leave 3-5 main stems and prune suckers aggressively. Determinate tomatoes? Minimal pruning—just remove diseased or crowded leaves. Less is more!
Will pruning delay my first harvest?
Not if done right! Pruning now redirects energy to stronger roots and more flowers/fruit later. You might see smaller early yields, but your plant will produce bigger, healthier tomatoes over the season. Think of it like investing in your harvest’s future!
What’s an alternative if I missed the pruning window?
No worries! If you skipped early pruning, focus on suckers now and support the plant with a cage or stake to prevent sprawl. For determinate tomatoes, prune only to improve airflow—remove yellow/damaged leaves. Mulch heavily to retain moisture and reduce stress.
Wrapping up and next steps
Your 8-week-old tomato plant is now at a thrilling stage—full of potential for a bountiful harvest!
With the right pruning techniques, you’ve set the stage for bushier growth, stronger stems, and bigger, juicier tomatoes. 🌱✨ Remember, consistency is key: keep an eye on your plant’s health, stay patient, and let nature (and your green thumb!) do the magic.
Ready to take the next step? Monitor your plant weekly, adjust pruning as it grows, and soon, you’ll be feasting on homegrown tomatoes straight from your garden. Happy growing! 🍅🌟