
Companion Plants
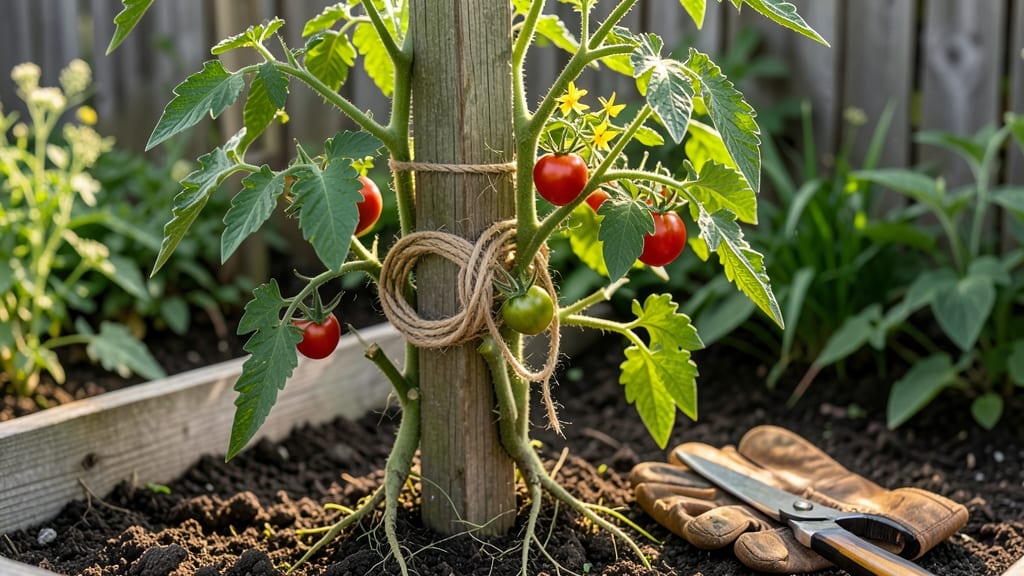
The best way to tie tomato plants isn't just about keeping them upright—it's about unlocking their full potential. 🌱 I've tried everything from flimsy twine to rigid cages, and the right method makes a world of difference in how your plants grow.
The best approach depends on your tomato variety, space, and how much you're willing to fuss with maintenance.
You'll need just a few simple supplies: sturdy bamboo stakes or metal cages, soft garden twine (not wire), and some basic tools like pruners and a measuring tape.
The key is choosing supports that won't snap when your plants hit 6 feet tall—because let's be real, those vines get heavy fast. I recommend starting when plants are about 12 inches tall, before they get too top-heavy.
When you tie, wrap the twine loosely around the main stem and stake, making gentle figure-8 loops that won't cut into the plant as it thickens. Think of it like giving your tomato a supportive hug—firm enough to guide growth, but not so tight it leaves marks.
This method keeps stems strong and prevents the dreaded "flop" that turns your prize plants into ground-hugging messes.
Here's the best part: once you get the hang of it, you'll notice your tomatoes ripen faster, produce more fruit, and stay healthier all season. And don't worry—even if you mess up a tie or two, your plants will forgive you. The real secret is consistency, not perfection.
📚 In This Guide
- What you need
- Instructions
- Tips and common mistakes
- Wrapping up and next steps
What you need
- ● Tomato cages or stakes: For determinate tomatoes (bush varieties): 4–6 ft tall cages (1–2 per plant).
- ● For indeterminate tomatoes (vining varieties): 6–8 ft tall stakes or cages (1 per plant).
- ● Soft plant ties: Jute twine, soft plastic ties, or cloth strips (avoid wire—it can damage vines!).
- ● At least 3–4 ties per plant (more for windy areas).
- ● Scissors or pruning shears: For trimming excess foliage or adjusting ties.
- ● Garden gloves: To protect your hands while handling thorny vines.
- ● Trellis or bamboo poles: For a DIY support system (space 2–3 ft apart).
- ● Staples or zip ties: For securing cages to stakes in windy conditions.
- ● Pruning clips: To remove suckers without tying.
- ● Waterproof tape: For labeling cages if growing multiple varieties.
Step-by-step instructions for tying tomato plants like a pro
Here's how I keep my tomato vines sturdy, disease-free, and thriving all season long.
🪴 Step 1: Choose the Right Support System
Start with a strong, weather-resistant stake—I use 5-6 foot bamboo or wooden stakes for determinate tomatoes and tall metal cages for indeterminate varieties. For extra stability, drive stakes 2 inches deep into the soil at planting time, especially in windy areas. If using cages, place them next to the plant so the main stem can grow through the center opening.
This prevents future root disturbance when tying. I always check the support can handle 10+ pounds of fruit weight—nothing worse than a snapped stake mid-summer when your tomatoes are ripe. For heavy producers, I double up with two stakes tied together at the base.
✂️ Step 2: Select the Best Tying Materials
Skip cheap twine—it stretches and cuts into stems. Instead, I use soft cloth strips (like old T-shirts cut into 1-inch bands) or plastic plant ties with adjustable loops. These materials won't girdle the stem as the plant thickens. Cut strips 12-18 inches long—long enough to wrap around both the plant and stake without overlapping.
Here's the thing—soft materials are gentler on stems. I've seen hard plastic ties leave permanent grooves that weaken the vine over time. Store your tying supplies in a dry, shaded spot to prevent rot or brittleness before use.
🌱 Step 3: Tie the First Support at Planting Time
As soon as your transplant goes in, tie the main stem to the stake just above the first set of true leaves. Use a loose knot—tight enough to hold the plant upright but with room to grow. Think of it like a seatbelt: snug but not cutting off circulation. I make a simple square knot and tuck the loose ends behind the stem for easy adjustments later.
This first tie prevents the plant from flopping over when it gets its first heavy rain. Watch for wind gusts—if the plant leans more than 30 degrees, it's time to retie. I check this every 3-4 days during windy periods to avoid stem damage.
💧 Step 4: Add Supports Every 6-12 Inches of Growth
When the main stem reaches 6 inches tall, tie it again—this time below the newest set of leaves. Use a new strip each time to avoid weakening the stem. I like to spiral the plant upward along the stake, making ties every 6-12 inches as it grows. For indeterminate tomatoes that keep growing all season, I add supports every 2 weeks until they hit the top of the stake.
This method keeps the plant upright and air-circulating, which prevents diseases like blight. You'll see the difference immediately—properly tied plants develop stronger stems and more even fruit production than those left to sprawl. If a vine gets too heavy between ties, the plant will bend at the weakest point—usually right above the last tie.
☀️ Step 5: Adjust and Maintain Through the Season
Check your ties weekly during the growing season. As the stem thickens, what was once a snug fit becomes too tight. Simply loosen the knot or replace the tie with a fresh strip. I keep a small scissors and extra ties in my gardening bucket for quick fixes. If you notice discoloration or grooves in the stem from old ties, remove them immediately to prevent girdling.
Here's a pro tip: Water the soil before tying—moist stems are more flexible and less likely to snap when adjusted. During heavy rain, I give the stakes an extra check to ensure they're still planted firmly. By mid-summer, your properly tied tomato plants will look like little trees, supporting their own weight with minimal effort from you.
Tips & tricks for perfect tomato plant supports
These game-changing techniques will transform your tomato plants into sturdy, high-yielding powerhouses—no more flopping vines or snapped stakes!
Support System Stability: When driving your 5-6 foot stakes 2 inches deep, use a mallet for even pressure—don't just pound with a hammer. I've seen stakes loosen after heavy rains when not seated properly. For extra insurance, add a second stake tied at the base for indeterminate varieties. This creates a tripod effect that handles 10+ pounds of fruit like a breeze.
Material Selection Matters: Your 1-inch cloth strips should be made from natural fibers like cotton—not synthetic blends that can degrade in sunlight. I cut them from old T-shirts because they're breathable and stretch slightly as the stem grows. Pro tip: Keep a small roll of these strips in your gardening bucket for quick adjustments. The adjustable plastic ties are great too, but I reserve them for final positions where the stem won't thicken much more.
Growth Pattern Strategy: The 6-12 inch spacing between ties creates the perfect spiral pattern that guides the plant upward while preventing it from getting tangled. I always tie below the newest set of leaves to encourage upward growth rather than bushy side shoots. For indeterminate tomatoes, mark your stake with a pencil every 2 weeks to track growth progress—this helps you maintain consistent spacing as the plant races toward the top.
Seasonal Maintenance Secret: Your weekly checks should include a quick tug test on the stakes—if they wobble more than 1 inch, they need re-driving. I've learned this the hard way after summer storms! Also, keep a pair of sharp scissors handy to trim any suckers that form at the ties. These little adjustments make all the difference between a plant that struggles and one that thrives.
Pro Tips for Best Way To Tie Tomato Plants
- These game-changing techniques will transform your tomato plants into sturdy, high-yielding powerhouses—no more flopp...
- Support System Stability: When driving your 5-6 foot stakes 2 inches deep, use a mallet for even pressure—don't just ...
- Material Selection Matters: Your 1-inch cloth strips should be made from natural fibers like cotton—not synthetic ble...
Frequently asked questions
Got questions about tying tomato plants? You’re not alone!
Here are answers to the most common concerns—from timing to troubleshooting—so you can keep your vines happy and productive.
When is the best time to start tying tomato plants?
Start tying once your plants reach 12–18 inches tall and have a few sets of true leaves. For indeterminate varieties (like cherry tomatoes), tie them every 6–12 inches as they grow. Determinate tomatoes (bush types) need support only if they topple—usually around fruit set. Wait until morning when vines are slightly damp for easier handling!
What’s the best material to tie tomato plants?
Use soft, flexible ties like:
- Jute twine or soft cloth strips (eco-friendly, biodegradable)
- Velcro plant ties (reusable, gentle on stems)
- Old T-shirts or fabric strips (free and effective!)
How tight should the ties be? Will they hurt my plants?
Ties should be snug but not restrictive. Imagine giving the vine a gentle hug—firm enough to hold it upright but loose enough to slide two fingers between the tie and stem. Never tie too tight; this can strangle the plant and create entry points for pests/disease. If you see discoloration or cracks, loosen or replace the tie immediately.
Can I use stakes, cages, or trellises instead of tying?
Tying is just one method—choose what fits your garden:
- Stakes: Best for indeterminate tomatoes (like Roma or Beefsteak). Use 2–3 stakes per plant for extra support.
- Cages: Great for determinate varieties (like Bush Early Girl). Install at planting time to avoid root disturbance.
- Trellises: Ideal for vertical gardening (save space!) but require frequent tying as vines grow.
My tomato plant’s leaves are yellowing after tying—what’s wrong?
Yellowing leaves after tying usually means one of three issues:
- Ties are too tight (restricting sap flow). Loosen immediately and switch to a softer material.
- Overwatering or poor drainage. Check soil moisture—tied plants can’t "breathe" as well if roots are waterlogged.
- Pest damage (like aphids or spider mites). Inspect stems and leaves; treat with neem oil if needed.
Wrapping up and next steps
Mastering the best way to tie tomato plants ensures healthier vines, bigger yields, and fewer pests—all while saving you time and effort later! Whether you choose stakes, cages, or trellises, consistency and gentle support are key.
Don’t let fear of over-tightening hold you back—your tomatoes will thank you with juicy, sun-ripened rewards.
Ready to transform your garden? Grab your supplies, pick a method, and start tying today—your future harvest is waiting! 🌱✨ Pro tip: Snap a photo of your setup for next year’s reference!