
Planting
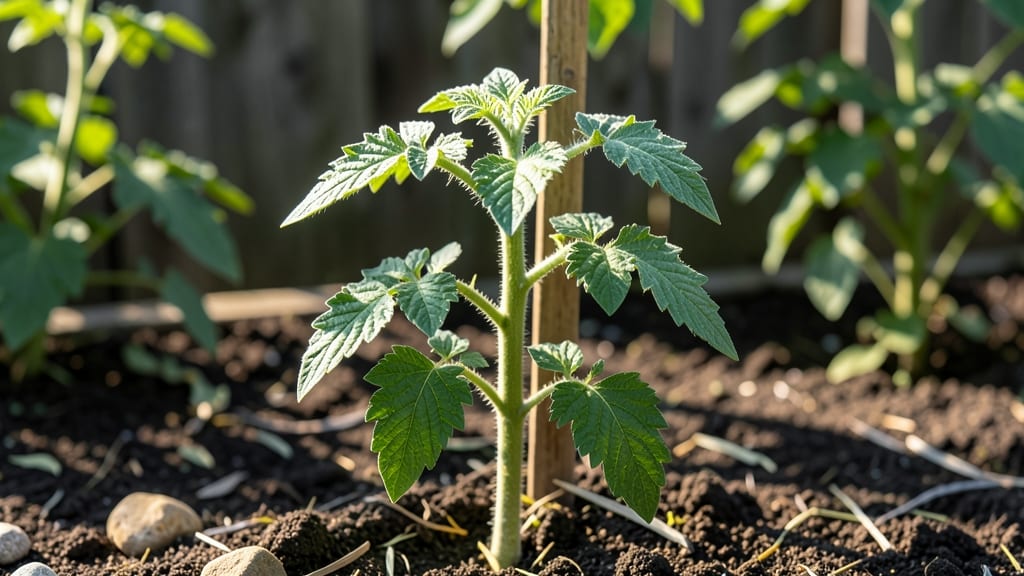
Your tomato plant after 3 weeks should now be standing 4-6 inches tall with 4-6 true leaves—this is where the real magic begins. 🌱 If they're still tiny or leggy, don't panic; we'll fix that before transplanting.
The next 2-3 weeks will determine whether you end up with bushy, productive plants or weak, sprawling shadows of their potential.
Now's the time to check for yellowing leaves (overwatering) or purple stems (underwatering)—both are easy to correct with a simple adjustment. Give them bright light (6+ hours daily) and water only when the top inch of soil feels dry.
A gentle pinch of fertilizer (like 5-5-5) now will give them a growth boost without burning tender roots.
Watch for pests like aphids (tiny green bugs) or damping off (black, mushy stems)—both can derail progress. If you spot them, act fast with neem oil or better yet, a strong spray of water to knock them off.
Healthy plants at this stage develop sturdy stems and dark green foliage, setting them up for strong transplanting in 2-3 weeks.
This is also when you decide if they're ready for hardening off—a process that prepares them for outdoor life. Start by moving them outside for a few hours daily, then gradually increase their time outside.
By the time they're 6-8 inches tall, they'll be ready to call your garden home permanently.
📚 In This Guide
- What you need
- Instructions
- Tips and common mistakes
- Wrapping up and next steps
What you need
- ● Tomato seedlings (3–5 plants, depending on space; choose disease-resistant varieties like Early Girl or Cherry Roma)
- ● Well-draining potting mix (5–10 gallons, enriched with compost or a balanced fertilizer like 10-10-10)
- ● Containers or garden beds (5–10 gallon pots with drainage holes or a raised bed with at least 12" depth)
- ● Sturdy stakes or cages (2–3 per plant, 4–6 ft tall; bamboo or metal works best)
- ● Watering can or hose with a gentle nozzle (avoid overhead spraying to prevent disease)
- ● Pruning shears (sterilized with rubbing alcohol)
- ● Mulch (2–3 inches of straw or shredded leaves to retain moisture)
- ● Slow-release fertilizer (e.g., Osmocote for tomatoes)
- ● pH test kit (ideal soil pH: 6.0–6.8)
- ● Grow lights (if indoors or in low-light areas)
- ● Compost tea or liquid fertilizer (for a nutrient boost)
- ● Row covers or shade cloth (to protect from pests or harsh sun)
Tomato plants after 3 weeks: key growth check and next steps
Here's how to assess your seedlings and give them the boost they need for strong, productive plants.
🌱 Step 1: Assess Seedling Health and Structure
Examine each plant for first true leaves—the second set that appear after the initial seed leaves (cotyledons). Healthy seedlings should have 2-4 true leaves and stems about 6 inches tall. Look for deep green color and sturdy stems that don't flop when touched. If leaves appear yellow or stems look thin and stretched, your seedlings need more light immediately.
Check the roots by gently squeezing the pot sides. Roots should fill about half the container—if they're circling or growing through drainage holes, it's time to transplant. Here's the thing—roots that can't expand will create weak, top-heavy plants that struggle later. If you see dark, mushy spots on stems, damping-off disease has set in and you'll need to remove affected plants immediately.
☀️ Step 2: Evaluate Light Exposure and Adjust Position
Hold your hand between the plants and light source—if you can't fit your fingers comfortably, the light is too close. Seedlings need 14-16 hours of light daily, but most grow lights or windows provide insufficient intensity. Leggy seedlings with leaves spaced more than 1 inch apart are starving for light. Move the light source within 2-4 inches of the tallest plants and raise it as they grow.
Rotate the tray a quarter turn daily so plants grow straight instead of leaning. You'll see this in the way leaves fan out evenly rather than all growing toward one side. If using natural light, position seedlings on a south-facing windowsill where they'll receive the strongest morning sun. Real talk: a sunny window alone rarely provides enough intensity for healthy tomato growth beyond this stage.
💧 Step 3: Adjust Watering Routine for Stronger Roots
Water only when the top inch of soil feels dry to touch. Overwatering at this stage causes roots to suffocate and stems to rot. Use room-temperature water and water at the base rather than overhead to prevent fungal diseases. You'll know you're doing it right when the soil surface looks slightly damp but not glistening with moisture.
Start fertilizing with a balanced liquid fertilizer (10-10-10) diluted to half strength. Apply every 2 weeks to provide essential nutrients without burning tender roots. I like to fertilize in the morning so plants have time to absorb nutrients before evening. Watch for dark green leaves with visible veins—this indicates healthy nutrient uptake. If leaves yellow between veins, your plants need more iron or zinc.
✂️ Step 4: Prune for Stronger Growth Habits
Pinch off the top set of leaves just above the third leaf pair to encourage bushier growth. This might seem counterintuitive, but removing the main stem's growing tip forces energy into lateral branches. You'll see new growth sprout from the leaf axils within 7-10 days. For indeterminate varieties, continue pinching to maintain a 3-4 foot height until transplanting.
Remove any leaves that touch the soil or have brown spots. These create ideal conditions for diseases like early blight. Use clean, sharp scissors and make cuts at a 45-degree angle just above a leaf node. Don't skip this—healthy foliage means stronger plants that can support heavy fruit later. I always sterilize my pruners with rubbing alcohol between cuts to prevent spreading pathogens.
🪴 Step 5: Prepare for Transplanting in 2 Weeks
Begin hardening off seedlings by placing them outside in partial shade for 1-2 hours daily. Gradually increase exposure over 10-14 days until they can handle full sun. Start with a sheltered spot like under a patio cover where they're protected from wind. You'll know they're ready when they don't wilt after a full day outside.
Choose transplant containers that are at least 1 gallon in size with drainage holes. Fill with a mix of 60% potting soil and 40% compost to provide nutrients without being too dense. Water the new pots thoroughly before transplanting and bury seedlings deeper than they were in their original pots—up to the first true leaves. This encourages stronger root development at the stem base.
Tips & tricks for healthy tomato seedlings
These practical insights will help you nurture sturdy, productive tomato plants from this crucial three-week stage.
Light Intensity Check: The 14-16 hours of daily light requirement is non-negotiable for tomato seedlings. If your grow lights aren't providing sufficient intensity, supplement with a secondary light source or move plants closer—within those 2-4 inches of the tallest seedlings. I've found that using a simple LED grow light on a timer solves most indoor light deficiencies. For natural light, consider adding a reflective surface behind your seedlings to maximize available sunlight.
Root Development Insight: When checking roots in Step 1, pay special attention to the color—healthy roots should be white or pale yellow. Any brown or black roots indicate rot from overwatering or poor drainage. If you notice roots growing through drainage holes, it's definitely time to transplant. Between us, I've learned the hard way that waiting too long for roots to fill containers creates weak structural support that leads to floppy plants later.
Fertilizer Application Strategy: That 10-10-10 fertilizer recommendation is perfect for balanced nutrition, but timing matters. I've found that applying fertilizer in the morning gives roots several hours of daylight to absorb nutrients before evening. For the best results, mix your diluted fertilizer with water and apply it directly to the soil surface rather than pouring it around the stem. This prevents potential stem burn while ensuring roots get access to nutrients.
Pruning Technique: When pinching off the top set of leaves above the third leaf pair in Step 4, make your cut clean and precise. The 45-degree angle isn't just for aesthetics—it creates more surface area for water absorption and prevents moisture buildup that could lead to disease. I always use sterilized scissors and make the cut just above a leaf node where new growth will emerge. This technique forces energy into lateral branches, creating a bushier plant that can support heavier fruit loads later in the season.
Pro Tips for Tomato Plant After 3 Weeks
- These practical insights will help you nurture sturdy, productive tomato plants from this crucial three-week stage.
- Light Intensity Check: The 14-16 hours of daily light requirement is non-negotiable for tomato seedlings. If your gro...
- Root Development Insight: When checking roots in Step 1, pay special attention to the color—healthy roots should be w...
Frequently asked questions
Got questions about your tomato plant’s progress after three weeks? We’ve got answers!
Whether you’re troubleshooting slow growth, wondering about pruning, or curious about what’s next, here’s what you need to know.
Why is my tomato plant only a few inches tall after 3 weeks?
Don’t panic—slow growth is normal, especially if you started with seeds! Tomato seedlings need time (and patience ). Ensure they get 6–8 hours of sunlight daily and keep soil moist but not soggy. If growth is still sluggish, check for low light or nutrient deficiencies (like yellowing leaves).
When should I transplant my 3-week-old tomato seedlings outdoors?
Hold off until nighttime temperatures stay above 50°F (10°C)—tomatoes are frost-sensitive! Harden off seedlings first (acclimate them to outdoor conditions over 5–7 days). Look for 2–3 true leaves and a sturdy stem before moving them to the garden or pots. Early May or late April (varies by zone) is ideal for most regions.
Can I prune or pinch my tomato plant at 3 weeks old?
Not yet! Pruning too early can stress young plants. Wait until they’re 12–18 inches tall and have a few sets of leaves. For indeterminate varieties, pinch off suckers (side shoots) later to encourage upward growth. Determinate tomatoes (bush types) usually don’t need pruning—focus on support instead!
What if my tomato plant’s leaves are yellow or curling after 3 weeks?
Yellow leaves often signal overwatering, underwatering, or nutrient issues. Check soil moisture—it should feel like a damp sponge. For curling, inspect for pests (aphids, spider mites) or heat stress (provide shade if temps exceed 90°F/32°C). A balanced 10-10-10 fertilizer can help if growth is stunted.
Can I use Epsom salt on my 3-week-old tomato plant?
Yes, but sparingly! Epsom salt (magnesium sulfate) can boost growth, but too much harms young roots. Mix 1 tablespoon per gallon of water and apply every 2–3 weeks during the growing season. Monitor for signs of overuse (brown leaf edges). Organic alternatives like compost tea also work!
Wrapping up and next steps
After just three weeks, your tomato plant is already on an exciting journey! You’ve laid the foundation for a thriving harvest by ensuring proper light, soil, and care—and the best part? The real magic happens next. 🌱✨
Stay consistent with your watering, pruning, and feeding, and soon, you’ll be rewarded with juicy, homegrown tomatoes. Ready to take the next step? Plan your trellis or support system now to give those vines the room they’ll need to flourish!