
Planting
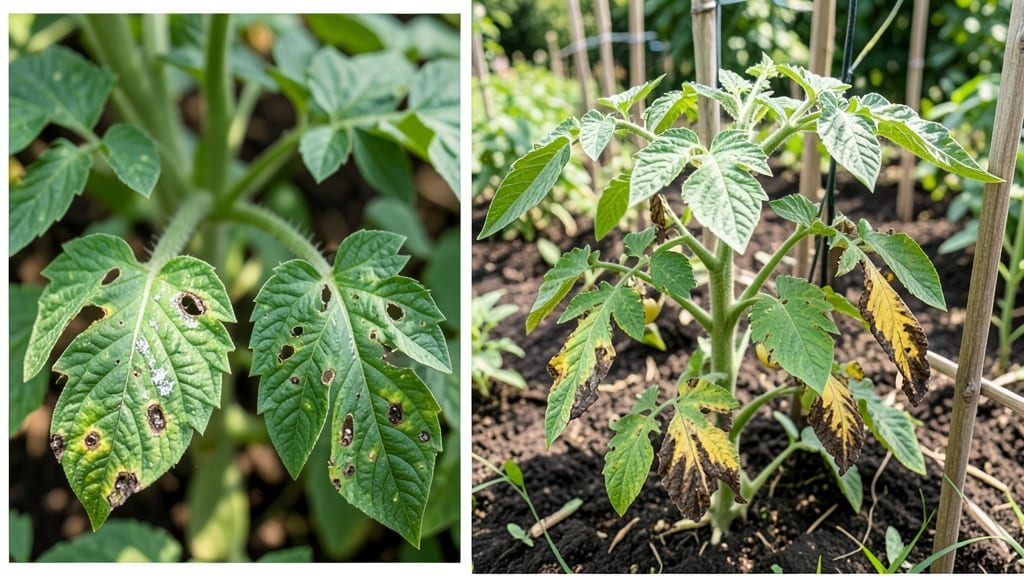
Your tomato plant leaves dying? That first wave of yellowing or wilting can feel like a death sentence—but it’s rarely too late to save your harvest. 🌱 I’ve nursed back plants with crispy edges, black spots, and even fungal rot, and the key is acting fast with the right diagnosis.
What looks like neglect might actually be a simple fix, like adjusting water or pruning too aggressively.
The most common culprits are overwatering (which chokes roots), fungal diseases (like early blight), or pests (aphids love stressed plants). Start by checking the soil—it should feel damp but not soggy—and look for signs like brown spots, webbing, or sticky residue.
A quick spray of neem oil or a switch to drip irrigation can work wonders for both pests and fungal issues.
Within days of proper care, you’ll see new growth pushing through, and those wilting leaves will start to perk up. The secret is consistency: don’t let the soil dry out completely, and remove any diseased foliage immediately.
By the time your tomatoes start ripening, your plants will be back to their strong, productive selves.
For stubborn cases, professional help might be worth it—but most gardeners can fix this at home with basic tools and a little patience. The sooner you act, the sooner you’ll be back to enjoying those homegrown tomatoes you’ve been dreaming of.
📚 In This Guide
- What you need
- Instructions
- Tips and common mistakes
- Wrapping up and next steps
What you need
- ● Gloves (1 pair) – Protect your hands from dirt and sharp plant debris.
- ○ Pruning shears (1 pair, sterilized) – Sharp, clean blades prevent disease spread. (Optional: rubbing alcohol for sterilization.)
- ● Trowel or small shovel – For gently loosening soil around roots if needed.
- ● Spray bottle (8–16 oz) – For targeted watering or fungicide application.
- ○ pH testing kit – Soil pH 6.0–6.8 is ideal for tomatoes. (Optional: liquid test kit for convenience.)
- ○ Moisture meter – Checks soil hydration levels. (Optional: finger test if you’re a pro!) 😉
- ● Fungicide (copper-based or neem oil) – For fungal diseases like early blight or septoria leaf spot. (Follow label instructions!)
- ● Epsom salt (1 lb bag) – Adds magnesium if leaves show yellowing between veins.
- ○ Compost or balanced fertilizer (10-10-10 or 5-5-5) – Revives nutrient-deficient plants. (Optional: slow-release granules for long-term health.)
- ● Mulch (straw, wood chips, or black plastic) – Retains moisture and regulates soil temp.
- ● Hose with adjustable nozzle – For deep watering (avoid overhead spraying to prevent fungal spread).
- ● ✅ Time – 30–60 minutes for inspection and initial fixes.
- ● ✅ Sunlight access – Work during early morning or late afternoon to avoid stressing plants.
- ● ✅ Weather check – Avoid diagnosing/treating during rain or extreme heat.
Quick fixes for tomato plant leaves dying: Step-by-Step rescue
Here’s how I save tomato plants when leaves start yellowing or wilting—fast, without losing the whole harvest.
🌿 Step 1: Check for Overwatering or Underwatering
First, stick your finger 1 inch deep into the soil. If it feels soggy or water drips out, you’re overwatering—tomatoes hate wet roots. Yellowing leaves with crisp edges? That’s the classic overwatering sign. Let the soil dry out completely between waterings, especially in containers.
On the flip side, if the soil feels bone-dry and leaves droop but don’t snap back when you touch them, it’s underwatering. Water deeply until it runs out the drainage holes, then wait until the top 2 inches feel dry before watering again. Mulch helps retain moisture—just spread a 2-inch layer around the base (but not touching the stem).
☀️ Step 2: Assess Sunlight and Adjust Position
Tomatoes need 6-8 hours of direct sun daily. If leaves yellow between veins (chlorosis), they’re not getting enough light. Move the plant to a sunnier spot immediately—even a few hours more sun makes a difference. South-facing windows or full sun in the garden are ideal.
Watch for scorch too: crispy, brown edges mean too much midday sun. In hot climates, provide afternoon shade with a lightweight shade cloth (30-50% block) if leaves look stressed. You’ll see new growth within 3-5 days of adjusting light.
💧 Step 3: Test for Pests or Disease
Inspect the undersides of leaves for tiny bugs (aphids, spider mites) or sticky residue (aphid honeydew). Wipe leaves with a damp cloth or spray with neem oil (1 tsp per quart of water) if you spot pests. Yellowing paired with white spots? That’s likely early blight—remove infected leaves immediately and space plants wider for airflow.
For fungal issues, avoid watering overhead. Water at the base in the morning so leaves dry quickly. If roots look mushy when you gently tug the plant, it’s root rot—repot in fresh soil and trim away blackened roots with sterilized scissors.
✂️ Step 4: Prune and Fertilize for Recovery
Snip off yellow or wilted leaves at the base with clean shears. This redirects energy to healthy growth. Don’t remove more than 20% of the foliage at once—tomatoes need leaves to photosynthesize. Focus on lower leaves first, as they’re more prone to disease.
Feed with a balanced fertilizer (10-10-10) if leaves are pale green—this signals nitrogen deficiency. Mix 1 tablespoon per gallon of water and apply at the soil line, not the leaves. You’ll notice stronger stems and deeper green color within 7-10 days.
🌱 Step 5: Monitor and Prevent Future Stress
Keep a log of watering and sunlight adjustments. Healthy tomatoes should have deep green, firm leaves and no wilting by midday. If problems persist, dig up the plant and check the roots—healthy roots are white or light tan, not brown or mushy.
For future plants, use well-draining soil and containers with drainage holes. Mulch consistently to stabilize soil moisture. A quick daily check (feel the soil, glance at leaves) prevents most issues before they start.
Tips & tricks for reviving tomato plants with dying leaves
These quick fixes will help you diagnose and treat your tomato plants before it's too late—because sometimes the difference between saving and losing your harvest comes down to timing and attention to detail.
Soil Test Trick: When checking for overwatering in Step 1, press your finger deeper than just 1 inch—up to 2 inches—to get a full picture of moisture levels. If the top inch is dry but the second inch is still damp, you're in that tricky middle zone where roots can't breathe properly. This is especially common in containers, where water evaporates faster. Let the top 2 inches dry completely between waterings to prevent root suffocation.
Light Adjustment Hack: If you're dealing with chlorosis (yellowing between veins) in Step 2, don't just move the plant—rotate it 180 degrees weekly. This ensures all sides get even sunlight exposure, preventing lopsided growth. For indoor plants, supplement with a grow light 12 inches away for 14 hours daily if natural light is insufficient. You'll notice new leaves emerging within 3-5 days of proper light exposure.
Pest Prevention Strategy: In Step 3, if you spot aphids or spider mites, don't just treat the visible leaves. These pests love to hide in leaf axils (where the stem meets the leaf). Use a cotton swab dipped in soapy water to gently clean these crevices. For severe infestations, repeat neem oil treatment every 5-7 days—consistency is key to breaking the pest life cycle.
Pruning Wisdom: When removing yellow or wilted leaves in Step 4, always cut at a 45-degree angle just above a leaf node (the bump where leaves grow). This encourages new growth from that point. And here's a pro move: save those healthy-looking lower leaves you're tempted to prune—they can be used as cuttings to propagate new plants! Just root them in water for 2-3 weeks before transplanting.
Pro Tips for Tomato Plant Leaves Dying
- These quick fixes will help you diagnose and treat your tomato plants before it's too late—because sometimes the diff...
- Soil Test Trick: When checking for overwatering in Step 1, press your finger deeper than just 1 inch—up to 2 inches—t...
- Light Adjustment Hack: If you're dealing with chlorosis (yellowing between veins) in Step 2, don't just move the plan...
Frequently asked questions
Got questions about your tomato plant’s dying leaves? You’re not alone!
Here are some of the most common concerns—and quick answers—to help you revive your garden before it’s too late.
Why are my tomato plant leaves turning yellow first?
Yellowing leaves (especially older ones) are often a sign of overwatering or nutrient deficiencies, like lack of nitrogen. Check the soil moisture—it should feel damp but not soggy. If the yellowing spreads to younger leaves, it could signal pests or disease. Act fast to prune affected areas and adjust watering habits!
How long does it take for tomato leaves to recover?
Recovery time varies! If the issue is environmental (like overwatering or sunburn), you might see improvement in 3–7 days with proper care. For disease or pests, it could take 2–4 weeks—or longer if the damage is severe. Consistency is key: monitor daily and adjust treatments as needed.
Can I save a tomato plant if half its leaves are dying?
Yes, but act quickly! Prune only the dead/diseased leaves (never more than ⅓ of the plant at once) and focus on fixing the root cause. If the stems are still firm and green, new growth can sprout. For fungal issues, use a copper fungicide or baking soda spray (1 tsp baking soda + 1 quart water).
Will dying leaves affect my tomato harvest?
It depends! If only a few leaves are dying, your plant may still produce fruit. However, severe leaf loss (especially from pests/disease) can reduce yield or quality. Prioritize saving the plant’s health over aesthetics—healthy vines = better tomatoes. Consider harvesting early if the plant is struggling.
What’s the fastest way to fix wilting tomato leaves?
Start with these 3 emergency steps:
- Water deeply (but only if soil is dry)—wilting can mean underwatering or root stress.
- Move to partial shade if leaves are crispy (sunburn) or droopy (heat stress).
- Trim dead leaves to redirect energy to healthy growth.
Wrapping up and next steps
Don’t let dying tomato leaves dampen your gardening spirit—most issues have simple fixes! 🌱 By identifying the root cause (whether it’s pests, disease, or environmental stress), you’ve already taken the first step toward revival. Prune damaged foliage, adjust care routines, and monitor your plants closely to see them thrive again.
Ready to turn things around? Start with one action today—check soil moisture, inspect for pests, or trim affected leaves—and watch your tomato plants bounce back! 🌿