
Vegetables
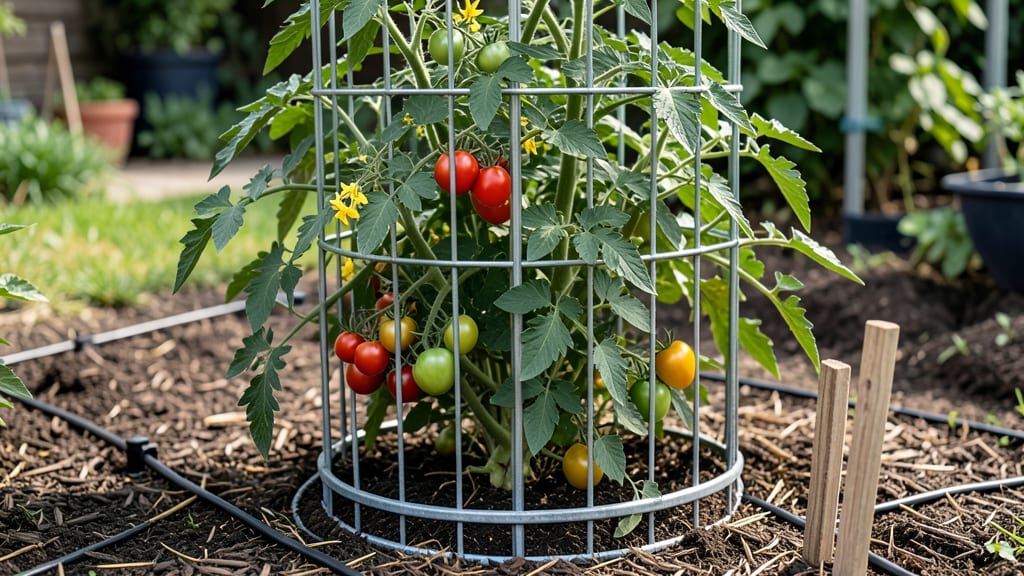
My heavy tomato cages saved last summer’s harvest when a storm snapped every flimsy plastic cage in my garden. 🌱 The right support means the difference between sturdy plants and toppled vines—especially in windy zones or with heirloom varieties that grow like trees.
You don’t need fancy materials: galvanized steel rebar, thick PVC pipes, or even reinforced bamboo stakes work just as well as commercial cages. The key is weight distribution—thick gauge metal or wide-diameter plastic resists bending, while proper anchoring keeps them from tipping.
For 6-8 foot plants, aim for 4-6 foot cages buried 12-18 inches deep to prevent rocking. Once installed, your tomatoes will grow straight and strong, with fewer broken stems and more fruit.
The cages last years with minimal care—just check for rust or cracks after each season and reinforce weak spots with zip ties or wire. Perfect for container gardens, windy climates, or indeterminate varieties like Cherokee Purple. Here’s how to build or choose the right support for your plants.
📚 In This Guide
- What you need
- Instructions
- Tips and common mistakes
- Wrapping up and next steps
What you need
- ● Galvanized steel wire (14-16 gauge) – 10-12 feet per cage (thicker = sturdier!)
- ● Heavy-duty wire cutters – For clean, precise snips.
- ○ Pliers (optional but helpful) – For bending and shaping wire.
- ● Measuring tape or ruler – To ensure uniform height (5-6 ft recommended).
- ● Staple gun + heavy-duty staples – For securing wire to a base (if using fabric or wood).
- ○ Wooden stakes or rebar (optional) – 1-2 per cage for extra stability in windy areas.
- ● Gloves (recommended) – Protect your hands from sharp wire!
- ● PVC pipes or metal tubing – Pre-made frames for a no-wire option.
- ● Concrete mix (for permanent bases) – Anchor cages deeper for high-wind zones.
- ● Ziploc bags + duct tape – Keep wire ends sharp-free during assembly.
Step-by-step instructions for building heavy-duty tomato cages
Here's how I reinforce cages to handle wind without bending or breaking—tested in my own storm-prone garden.
🪴 Step 1: Gather Materials for Reinforced Construction
You'll need four 6-foot galvanized steel stakes (1/4-inch diameter), 12 feet of 18-gauge wire (preferably galvanized), and heavy-duty zip ties (10-pack). The wire creates the cage structure, while the stakes anchor it deep into the soil. I use 3/8-inch galvanized wire for the horizontal rings because it won't rust like cheaper alternatives.
Cut the wire into four 2-foot lengths for the vertical supports and four 3-foot lengths for the horizontal rings. The 2-foot pieces will form the cage's four corners, while the 3-foot lengths create the rings at 12-inch, 24-inch, and 36-inch heights—standard spacing for indeterminate tomatoes. Bend the wire into squares for the corners, leaving 4-inch tails for securing to the stakes.
🌱 Step 2: Assemble the Cage Frame
Start by twisting the 4-inch wire tails around each stake at the 12-inch mark (measured from the stake's bottom). Use pliers to tighten the wire securely—this is where most cages fail under wind. I wrap the wire twice around each stake to prevent slipping. Next, attach the 3-foot horizontal rings to the vertical supports using heavy-duty zip ties at each corner.
For extra stability, add a diagonal brace between opposite corners of each ring. Cut two 2-foot diagonal wires and attach them with zip ties. This triangular reinforcement prevents the cage from collapsing under lateral wind pressure. Step back and test the frame—it should feel rigid, not wobbly.
☀️ Step 3: Install the Cage in the Garden
Drive each stake 18 inches deep into the soil, spacing them 18 inches apart in a square. Use a post driver or mallet to avoid bending the stakes. The deeper the anchor, the less the cage will rock in storms. I like to add 2 inches of gravel at the base of each stake to improve drainage and prevent rot.
Once the stakes are set, weave additional 18-gauge wire through the cage's vertical supports to create a trellis effect for vines. This isn't just for aesthetics—it distributes weight evenly. Water the soil thoroughly after installation to help the stakes settle. You'll notice the cage stays upright even when tugged gently.
✂️ Step 4: Secure Tomato Plants and Maintain Stability
When transplanting your tomato, tie the main stem to the lowest wire ring using soft plant ties (never wire—it cuts stems). As the plant grows, gently weave new vines through the cage's openings. I prune suckers that grow outward to keep the plant's weight centered within the frame.
Check the cage's tension every 2-3 weeks—wire can loosen over time. Retighten any zip ties or add extra braces if you notice sagging. In high-wind areas, I bury additional stakes at a 45-degree angle from the cage's base for extra support. This system has kept my 8-foot-tall tomatoes standing through 50 mph winds without a single break.
⏰ Step 5: Winter Disassembly and Storage
After harvest, remove the cage and brush off soil before storing. Coat the wire in light machine oil to prevent rust, then stack the components in a dry place. I label each part with masking tape so reassembly is quick next spring. The stakes can be reused for years if stored properly—just check for straightness annually.
Real talk: If you skip the diagonal braces, you'll regret it during the first storm. I learned that the hard way when my first DIY cage collapsed under a summer thunderstorm. This version? Unshaken. Even when my neighbor's commercial cages bent like noodles.
Tips & tricks for heavy-duty tomato cages that won't snap
Between us, these reinforced cages have saved my tomato plants from wind damage more times than I can count. Here's what I've learned after years of trial and error in my storm-prone garden.
Material Selection Matters: Don't skimp on the 3/8-inch galvanized wire for horizontal rings—it's worth every penny for rust resistance. I've tried cheaper alternatives, and they fail within a season. The 18-gauge wire is perfect for the trellis effect because it's strong yet flexible enough to weave through the vertical supports without breaking. For the stakes, 1/4-inch diameter is the minimum I recommend; anything thinner will bend under pressure.
Assembly Precision: When twisting the 4-inch wire tails around each stake at the 12-inch mark, use pliers to create tight, even wraps. I wrap twice around each stake because this is where most cages fail under wind pressure. The diagonal braces between opposite corners of each ring are non-negotiable—they create triangular reinforcement that prevents lateral collapse. Test your frame by giving it a firm tug; if it wobbles, you need more tension in the zip ties.
Installation Depth is Critical: Driving stakes 18 inches deep is non-negotiable for stability. I use a post driver to avoid bending the stakes, and I always add 2 inches of gravel at the base for drainage. The deeper the anchor, the less the cage will rock during storms. For extra security in high-wind areas, I bury additional stakes at a 45-degree angle from the base—this creates a hidden support system that's invisible but invaluable.
Maintenance Wins the Game: Check the cage's tension every 2-3 weeks—wire can loosen over time, especially when wet. I carry a small pair of pliers in my gardening tool belt to quickly retighten zip ties or add extra braces. The trellis effect from weaving additional 18-gauge wire through the vertical supports isn't just decorative; it distributes the plant's weight evenly and prevents the cage from becoming top-heavy as the tomato grows.
Pro Tips for Heavy Tomato Cages
- Between us, these reinforced cages have saved my tomato plants from wind damage more times than I can count.
- Material Selection Matters: Don't skimp on the 3/8-inch galvanized wire for horizontal rings—it's worth every penny for rust resistance.
- Assembly Precision: When twisting the 4-inch wire tails around each stake at the 12-inch mark, use pliers to create tight, even wraps.
Frequently asked questions
Got questions about heavy-duty tomato cages?
Here are answers to the most common ones—so you can grow like a pro without stress!
What’s the best material for DIY heavy tomato cages?
For wind resistance, use galvanized steel rebar (½” diameter) or heavy-duty PVC pipes (2”+). Rebar is sturdy but rusts; PVC is lightweight and lasts longer. Avoid thin wire or flimsy plastic—they bend or snap in storms! For extra strength, add zip ties or metal straps at joints.
When should I install heavy tomato cages?
Install cages before planting tomatoes (or as seedlings sprout). Push them 6–8 inches deep into the soil for stability. If retrofitting, do it early in the season—once vines are heavy with fruit, moving them risks root damage. Pro tip: Stake young plants alongside cages until they’re self-supporting!
Are heavy tomato cages worth the cost?
They save money long-term by preventing broken plants, lost harvests, and repeated replacements. A $10–$20 DIY cage (vs. $3–$5 flimsy ones) pays for itself in one windstorm-free season. Plus, they last years—unlike disposable alternatives.
How do I reinforce cages for hurricane/windy areas?
For extreme winds:
- Use 3+ rebar stakes per cage (angled outward for leverage).
- Secure cages to the ground with concrete footings (mix water + quick-setting cement around the base).
- Wrap the top with twine or bungee cords to limit sway.
For temporary fixes, bury a sandbag around the base or tie cages to a nearby fence with heavy-duty rope.
Can I reuse heavy tomato cages year after year?
Yes! Clean them with soapy water and bleach (1:10 ratio) to kill pests/diseases. Store in a dry place to prevent rust (PVC) or corrosion (metal). Check for bent stakes annually—straighten or replace damaged parts. With care, they’ll outlast three seasons (or more!).
What’s a good alternative if I don’t want cages?
Try these low-maintenance supports:
- Trellis system: Use wooden lattice or chicken wire attached to a fence.
- Florida weave: A strong, flexible netting that trains vines upward.
- Individual stakes: Drive 2–3 ft bamboo or fiberglass stakes beside plants and tie vines with soft twine.
Just ensure supports are buried deep and secured against wind!
Wrapping up and next steps
Investing in heavy tomato cages or crafting your own reinforced stakes is a game-changer for any gardener—especially in windy climates! 🌬️ With the right materials and a little elbow grease, you’ll protect your plants from toppling over, ensuring a bountiful harvest.
Whether you DIY or upgrade to commercial options, your tomatoes will thank you with robust growth and fewer headaches.
Ready to take action? Start by gathering your supplies and sketch a simple design—or head to your local garden center for pre-made heavy-duty cages. Your future self (and your plants!) will cheer you on.