
Companion Plants
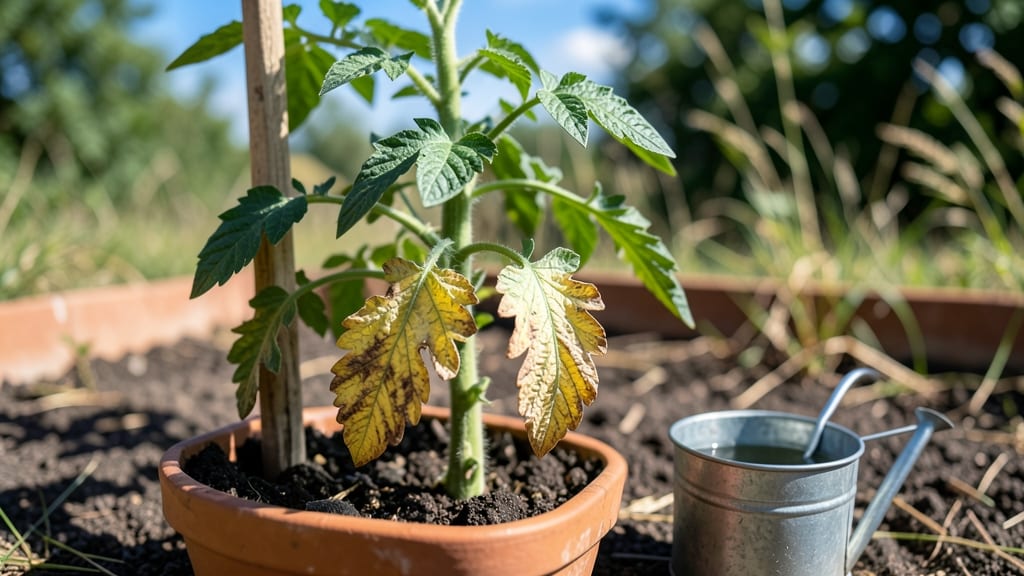
Your tomato plants turning yellow at the bottom isn’t just a cosmetic issue—it’s a cry for help from the roots. 🌱 I’ve seen this happen after heavy rains, overzealous watering, and even hidden root rot, and the good news is most cases are fixable with simple checks.
The first step is figuring out whether your plants need less water, more nutrients, or a complete soil overhaul.
Start by digging into the soil (literally) around the base of the plant. If the roots smell sour or look mushy, you’re dealing with overwatering or disease. Healthy roots should be firm and white.
Check the soil moisture too—if it’s soggy, cut back on watering immediately. Yellowing can also mean your plants are hungry for nitrogen or phosphorus, especially if the leaves are pale green, not yellow.
Once you’ve identified the problem, the fix is straightforward: adjust your watering routine, add compost or a balanced fertilizer, and prune any severely damaged leaves. I’ve revived plants that looked ready for the compost bin just by switching to drip irrigation and adding a handful of worm castings.
Within a week, new green growth appears at the base, and the plant starts recovering.
Prevention is easier than curing—mulch heavily to keep roots cool, water deeply but less frequently, and rotate crops yearly to prevent soil depletion. If the yellowing spreads to the entire plant or you see blackened stems, it’s time to call in a local extension office for a soil test.
Most gardeners never need that step, but it’s good to know when to ask for help.
Root Causes of Yellowing Tomato Leaves
Yellowing at the bottom of your tomato plants isn’t just a random quirk of nature—it’s a cry for help from your plants. Understanding the root causes (literally and figuratively) is the first step to saving your harvest.
Let’s dig into the science behind why those leaves lose their green and what’s really going on below the soil.
When tomato plants sit in soggy soil for too long, their roots suffocate. Oxygen deprivation triggers a chain reaction:
- Root rot (from fungi like Phytophthora) blocks nutrient uptake.
- Toxic buildup of salts or chemicals in waterlogged soil stresses the plant.
- Chlorosis (yellowing) occurs as the plant prioritizes survival over leaf pigment production.
Actionable clue: Check the soil—if it’s damp 2+ inches down after watering, you’re overdoing it. Tomato roots need well-draining soil (aim for 60% sand/silt mix) and consistent moisture, not puddles.
Tomatoes are heavy feeders, and yellowing often signals a mineral shortage. The most common culprits: - Nitrogen (N): Bottom leaves yellow first (older leaves) because the plant redirects N to new growth.
Soil tests often reveal levels below 50 ppm. - Magnesium (Mg): Interveinal yellowing (veins stay green) is classic magnesium deficiency, common in acidic or sandy soils.
Tomatoes need 0.5–1.0% Mg in soil. - Iron (Fe): Pale yellowing (not just bottom leaves) hints at chlorosis, worsened by alkaline soil (pH > 7.0). Iron is less available when pH rises.
Fix it fast:
- Side-dress with compost or a balanced fertilizer (10-10-10) every 3–4 weeks.
- Epsom salt spray (1 tbsp/gallon) for Mg—apply to leaves and soil.
- Chelated iron (for Fe) works best in alkaline soils.
Pathogens love damp, stressed plants. Two common offenders: - **Early Blight (Alternaria solani): Targets older leaves first, causing yellowing rings or spots that turn brown/crusty. Thrives in humid, warm conditions (75–85°F). - Verticillium or Fusarium Wilt: Soilborne fungi that clog xylem vessels, starving leaves of water/nutrients.
Yellowing spreads upward as the disease progresses.
Prevention & treatment:
- Rotate crops (avoid planting tomatoes/solances in the same spot for 3 years).
- Mulch (straw or black plastic) to reduce soil splashing onto leaves.
- Copper fungicide (for early blight) or resistant varieties (e.g., ‘Mountain Merit’ for Verticillium).
Tomatoes are tropical plants—heat, cold, or wind can trigger yellowing:
- Heat Stress: Temperatures above 90°F cause sunburn (yellow/brown scorch on leaves) and nutrient lockout (roots can’t absorb water).
- Cold Damage: Night temps below 50°F slow root activity, leading to yellowing and wilting.
- Windburn: High winds desiccate leaves, making them yellow and crispy.
Adjust the environment:
- Shade cloth (30–50%) during peak sun (especially in summer).
- Row covers for early/late seasons to protect from cold winds.
- Drip irrigation (not overhead) to keep leaves dry and cool.
Hidden pests sap nutrients from roots or leaves, causing yellowing:
- Root-Knot Nematodes: Microscopic worms that gall roots, reducing water/nutrient uptake. Look for stunted growth + yellowing despite healthy soil.
- Aphids/Spider Mites: Suck leaf sap, causing yellow stippling (tiny dots) on undersides of leaves.
Pest control tips:
- Neem oil spray (for soft-bodied pests like aphids).
- Marigolds as companion plants to repel nematodes.
- Beneficial nematodes** (Steinernema) to target root pests in soil.
Tomatoes thrive in slightly acidic soil (pH 6.0–6.8). Outside this range:
- pH > 7.0 (alkaline): Locks out iron, manganese, zinc → yellowing.
- pH < 5.5 (acidic): Leaches calcium, magnesium → weak stems, yellowing.
Test & adjust:
- pH test kit (or send soil to a lab).
- Lime (calcium carbonate) to raise pH (for acidic soil).
- Elemental sulfur to lower pH (for alkaline soil).
Disturbed roots during transplanting take weeks to recover, causing temporary yellowing. Signs:
- Wilting + yellowing within 1–2 weeks of planting.
- Stunted growth despite good care.
Prevent shock:
- Hardening off seedlings (acclimate to outdoor temps for 7–10 days).
- Deep planting (bury stems up to first leaves—roots form along the stem!).
- Avoid root disturbance when moving pots.
Quick Fixes for Yellowing Tomato Leaves
If your tomato plants are showing yellowing at the bottom, don’t panic—most issues are fixable with the right care! Below are practical, step-by-step solutions tailored to the most common causes, along with prevention tips to keep your plants thriving. 🌱💚
Yellowing leaves often mean your tomatoes are drowning in water or sitting in soggy soil. Overwatering cuts off oxygen roots need, leading to rot and nutrient starvation.
How to Fix It:
- 🔥 Check the Soil Moisture
- Stick your finger 1-2 inches deep into the soil. If it’s damp, hold off on watering.
- Pro Tip: Use a moisture meter for accuracy—no guesswork!
- 👨🍳 Improve Drainage
- If your pots lack drainage holes, add them or repot into containers with better airflow.
- For garden beds, amend heavy clay soil with compost or perlite to loosen it up.
- ⏰ Adjust Your Watering Routine
- Water deeply but less frequently—aim for 1-1.5 inches per week (including rain).
- Water at the base of the plant (not the leaves) to prevent fungal diseases.
Prevention:
- 🌡️ Mulch around plants to retain moisture without over-saturating roots.
- ✨ Choose well-draining soil mixes (e.g., 60% potting soil + 30% compost + 10% perlite).
Tomatoes thrive in warmth but not scorching heat. If leaves yellow and wilt in direct afternoon sun, they’re struggling with heat stress.
How to Fix It:
- 🍳 Provide Shade Cloth
- Use 30-50% shade cloth during peak sun (11 AM–3 PM) to block intense rays.
- Quick Fix: Prop up a white sheet or umbrella for temporary relief.
- 🥘 Water in the Morning
- Evaporative cooling helps—water deeply before 10 AM so roots stay hydrated.
- Avoid evening watering (encourages fungal growth).
- 🔪 Prune for Better Airflow
- Trim overcrowded leaves to improve circulation and reduce heat buildup.
Prevention:
- 🎯 Plant in late spring (after last frost) to avoid early-season heatwaves.
- 💡 Choose heat-tolerant varieties like ‘Solar Fire’ or ‘Heatmaster.’
Yellowing leaves with spots, mold, or a foul smell? Fungal infections like early blight or septoria leaf spot thrive in damp conditions.
How to Fix It:
- 🔥 Remove Infected Leaves
- Snip off yellow or spotted leaves with sterilized scissors (wipe with rubbing alcohol).
- Do NOT compost them—toss in the trash to prevent spread.
- 👨🍳 Apply Fungicide
- Spray with copper fungicide (like Bonide Copper Fungicide) every 7–10 days.
- Organic Option: Mix 1 tsp baking soda + 1 quart water + a few drops of soap for a DIY spray.
- 🥘 Space Plants for Airflow
- Ensure 18–24 inches between plants to reduce humidity around leaves.
Prevention:
- ✨ Water at soil level (use a soaker hose) to keep foliage dry.
- 🌡️ Avoid overhead watering—especially in the evening.
Yellowing at the bottom leaves (older growth) often signals nitrogen deficiency, while yellowing between veins may mean magnesium (Epsom salt) or iron issues.
How to Fix It:
- 🍳 Test Your Soil
- Use a DIY soil test kit (or send a sample to a local extension office) to check pH and nutrient levels.
- Ideal pH for tomatoes: 6.0–6.8.
- 🥘 Add Balanced Fertilizer
- For nitrogen: Use fish emulsion (5-1-1) or compost tea.
- For magnesium: Mix 1 tbsp Epsom salt per gallon of water and spray on leaves.
- For iron: Apply chelated iron or iron sulfate if leaves are pale yellow.
- 🔪 Side-Dress with Organic Matter
- Work aged manure or worm castings into the soil around (not touching) the stem.
Prevention:
- 💡 Follow a feeding schedule: Fertilize every 2–3 weeks during growing season.
- 🎯 Avoid over-fertilizing—too much salt can burn roots!
Chewing insects like aphids, spider mites, or whiteflies suck sap, causing yellowing and stunted growth.
How to Fix It:
- 🔥 Inspect Leaves Daily
- Look for sticky residue (honeydew), webs, or tiny bugs on undersides of leaves.
- 👨🍳 Blast Them Off
- Spray with soapy water (1 tsp mild soap + 1 quart water) to dislodge pests.
- 🔪 Prune heavily infested leaves and dispose of them.
- 🥘 Introduce Beneficial Insects
- Release ladybugs or lacewings (available at garden centers) to eat pests naturally.
Prevention:
- ✨ Encourage predator plants like basil, marigolds, or nasturtiums near tomatoes.
- 🌡️ Keep plants healthy—stressed plants attract more pests!
Final Pro Tip: 💡 Rotate crops annually to prevent soil-borne diseases from recurring. If all else fails, take a leaf sample to a local nursery for a quick diagnosis!
With these fixes, your tomato plants should bounce back in 1–2 weeks—and you’ll be on your way to a bountiful harvest! 🍅🌟
Frequently asked questions
Why do my tomato plants turn yellow at the bottom first?
Tomatoes use a process called nutrient translocation—when they need nutrients, they pull them from the oldest leaves (at the bottom) first. This is normal aging, but if it spreads or leaves look unhealthy (crispy, spotted), check for overwatering, nutrient deficiencies, or disease. Healthy plants may just shed a few bottom leaves as new growth takes priority.
Is yellowing at the bottom always a sign of overwatering?
Not necessarily! While soggy soil causes root rot (which yellows leaves), other common culprits include nutrient deficiencies (especially nitrogen), fungal diseases like early blight, or even heat stress. Always check the soil—if it's damp 2+ inches down after watering, you're likely overwatering. If dry, test for nutrients or pests first.
How can I tell if my tomato plant has root rot?
Look for these red flags: mushy, black roots, a sour smell from the soil, and leaves that yellow quickly after watering. Gently dig around the base—healthy roots should be firm and white. If you see rot, stop watering immediately, improve drainage, and consider repotting with fresh, sterile soil. Severe cases may require removing the plant entirely.
Will Epsom salt help if my tomato leaves are yellow between the veins?
Yes! Yellowing between veins (while veins stay green) is classic magnesium deficiency. Mix 1 tablespoon of Epsom salt per gallon of water and spray it on leaves every 2 weeks. For faster results, also work a handful of Epsom salt into the soil around the plant. This works best for established deficiencies—prevent future issues by adding compost regularly.
When should I stop trying to save my tomato plant?
If yellowing spreads to new leaves, stems turn black or mushy, or the plant wilts despite your best efforts, it's likely beyond saving. Also watch for powdery mildew or wilt diseases—these can't be cured. Pull the plant immediately to prevent spreading to others, then test your soil and adjust care for future plants. Sometimes it's better to start fresh!