
Plants
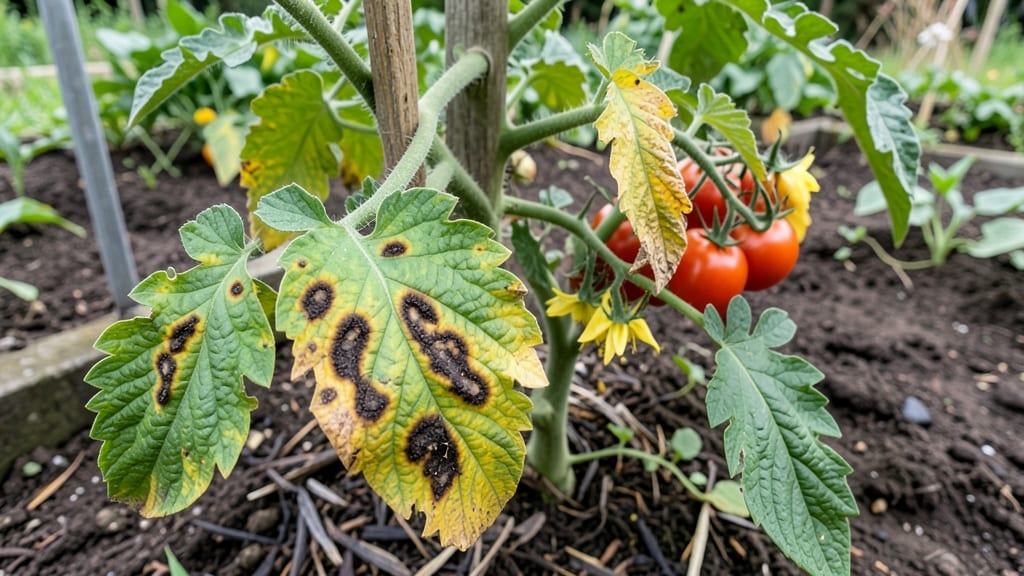
Yellow leaves with black spots on your tomato plants mean one thing: fungal blight is attacking, and time is running out. 🌱 I’ve lost entire harvests to this silent killer, but these three steps saved my next season—and they’ll work for you too.
The culprits are usually early blight or septoria leaf spot, both thriving in warm, humid conditions. You’ll spot concentric rings on leaves or dark spots with yellow halos, often starting at the bottom. The good news?
Catching it early means you can still salvage your plants and protect next year’s harvest. Start by pruning infected leaves immediately (don’t compost them!) and space plants wider for airflow. Then spray with a copper fungicide or homemade baking soda mix—both stop the spread fast.
Repeat every 7–10 days until new growth appears. With this approach, your plants will bounce back stronger, and you’ll enjoy vibrant green foliage and full tomatoes by summer’s end. The key is acting fast—don’t wait until the spots reach the stems.
Root Causes of Tomato Leaf Decline
When your tomato plants start showing yellowing leaves with black spots, it’s often a sign of stress or disease—but not always what you might first suspect. Understanding the underlying causes helps you take precise action to save your plants.
Below are the most common reasons this happens, explained in detail so you can diagnose and treat effectively.
Fungal diseases are the #1 culprit behind yellowing and black-spotted tomato leaves. These pathogens thrive in warm, humid conditions and can spread rapidly if left unchecked. Here’s how they attack:
- Early Blight (Alternaria solani)
- How it starts: Spores land on lower leaves, creating small, target-like black spots with yellow halos. As the disease progresses, spots expand, and leaves turn yellow before dying.
- Why it spreads: Fungal spores survive in soil and plant debris, splashing onto leaves during watering or rain. Warm nights (60–80°F) and high humidity accelerate growth.
- Key identifier: Black spots with concentric rings (like a bullseye) on the undersides of leaves.
- Late Blight (Phytophthora infestans)
- How it starts: Unlike early blight, late blight causes greasy-looking, dark brown to black spots that spread rapidly—even to stems and fruits. Leaves yellow and wilt within days.
- Why it spreads: This aggressive fungus loves cool, wet conditions (50–77°F) and can travel via wind or water. It’s especially devastating in greenhouses or shaded gardens.
- Key identifier: Spots appear on both sides of leaves, often with a white, fuzzy mold in humid conditions.
- Septoria Leaf Spot (Septoria lycopersici)
- How it starts: Tiny, dark brown/black spots with gray centers appear first, then merge into larger patches. Yellowing follows as leaves weaken.
- Why it spreads: The fungus overwinters in plant debris and splashes onto leaves during irrigation. It’s more common in overcrowded or poorly ventilated tomato patches.
💡 Pro Tip: If you see black spots with yellowing, check the leaf undersides and stems first—fungi often hide there before spreading. Early detection is key!
Tomatoes hate soggy roots. When soil stays too wet, it creates the perfect breeding ground for fungi and starves roots of oxygen, leading to:
- Root Rot (Pythium or Phytophthora)
- How it starts: Roots suffocate, turning black and mushy. Above ground, leaves yellow from the bottom up, then develop black, water-soaked spots as the plant weakens.
- Why it happens: Overwatering, compacted soil, or containers without drainage holes trap excess moisture. Fungal spores in wet soil infect roots within 48–72 hours.
- Key identifier: Yellowing + wilting despite moist soil + a rotten smell at the base of the stem.
- Nutrient Leaching
- How it starts: Constant watering washes away essential nutrients (like nitrogen and potassium), causing interveinal yellowing (veins stay green) paired with blackened leaf edges from stress.
- Why it happens: Sandy or peaty soils drain too quickly, but overwatering in heavy clay can also flush nutrients out, leaving plants malnourished.
🌡️ Warning Sign: Stick your finger 2 inches into the soil—if it’s damp after 24 hours, you’re overwatering. Tomatoes need 1–1.5 inches of water per week, delivered at the base, not overhead.
Extreme conditions—whether heat, cold, or sunlight—can weaken tomato plants, making them susceptible to secondary fungal infections. Here’s how:
- Heat Stress
- How it starts: Temperatures above 90°F (32°C) cause leaves to yellow and scorch, with blackened edges. The plant’s defenses drop, inviting fungi like early blight.
- Why it happens: High heat disrupts photosynthesis, and evaporation stress leads to nutrient imbalances (e.g., too much salt in soil).
- Cold or Windburn
- How it starts: Temperatures below 50°F (10°C) or harsh winds cause yellowing with dark, crispy spots (like frostbite). Weakened leaves are then easy targets for fungi.
- Key identifier: Spots are dry and papery, not wet or moldy.
- Poor Airflow
- How it starts: Crowded plants or dense foliage trap moisture, leading to yellowing with black spots from fungal growth (e.g., early blight).
- Why it happens: Stagnant air prevents leaves from drying quickly after watering, creating fungal hotspots.
✨ Solution: Use shade cloth in peak sun (30–50% coverage) and prune lower leaves to improve airflow. Space plants 18–24 inches apart.
Some pests don’t directly cause black spots but damage leaves, creating entry points for fungi. Common culprits:
- Spider Mites or Aphids
- How they help fungi: These pests pierce leaves, leaving tiny holes that let in spores. Their honeydew (sticky residue) also feeds sooty mold, which can darken leaves.
- Key identifier: Yellow stippling (tiny dots) on leaves + webbing (mites) or clustered bugs (aphids).
- Tomato Hornworms
- How they help fungi: Their chewed leaves create wounds where fungal spores land. Infested plants often show yellowing + black spots near feeding sites.
- Key identifier: Large, green caterpillars with white stripes and missing chunks of leaves.
🔥 Quick Fix: Spray plants with neem oil (for pests) and copper fungicide (for prevention) to break the cycle.
Fix Yellowing Tomato Leaves Fast
Now that you know the culprits behind those unsightly yellow leaves and black spots—whether it’s early blight, late blight, septoria leaf spot, or environmental stress—it’s time to take action. The good news?
Most of these issues are treatable with a mix of quick fixes, preventive care, and smart gardening habits. Below, we’ll break down the best solutions for each cause, so you can restore your tomato plants to full, healthy glory.
Early blight thrives in warm, humid conditions and can devastate your harvest if left unchecked. Here’s how to halt its progress and protect your plants:
🔥 Remove Infected Foliage Immediately
- Step 1: Snip off yellowed or spotted leaves (including stems) with sterilized pruners (wipe with rubbing alcohol between cuts).
- Step 2: Do not compost infected plant debris—burn or trash it to prevent spores from reinfecting your garden.
- Step 3: Focus on lower leaves first, as early blight spreads upward.
🍳 Apply Fungicidal Sprays (Organic or Chemical)
- Option 1 (Organic): Mix 1 tbsp baking soda + 1 tsp dish soap + 1 gallon water in a spray bottle.
Apply every 7–10 days at dawn or dusk to avoid burning leaves. - Option 2 (Chemical): Use copper fungicide or chlorothalonil (like Daconil)—follow label instructions for best results. - Pro Tip: Rotate treatments to avoid resistance. Alternate between baking soda spray and copper fungicide for stronger defense. ✨
🌡️ Improve Air Circulation & Watering Habits
- Space plants 18–24 inches apart to reduce humidity buildup.
- Water at the base (not overhead) early in the morning so leaves dry quickly.
- Mulch with straw or grass clippings to keep soil moist but prevent splashing spores onto leaves.
Late blight is one of the most destructive tomato diseases, spreading rapidly in cool, wet weather. If you see black, greasy spots with yellow halos, act immediately:
👨🍳 Remove & Destroy All Infected Plants
- Step 1: Pull up severely infected plants (including roots) and dispose of them in sealed bags.
- Step 2: Sterilize garden tools with a 10% bleach solution (1 part bleach to 9 parts water) to kill lingering spores.
- Step 3: Do not replant tomatoes or potatoes in the same spot for at least 3 years—late blight can survive in soil.
🥘 Use a Strong Fungicide (Preventative & Curative)
- Best defense: Chlorothalonil (Daconil) or metalaxyl (Subdue)—apply every 5–7 days until new growth appears.
- For organic gardens: Try neem oil + copper fungicide combo (spray in the evening).
- 💡 Pro Tip: If late blight hits, harvest ripe tomatoes immediately—even if the plant is dying, the fruit may still be safe to eat (peel and cook if possible). 🍅
⏰ Adjust Watering & Garden Layout
- Water deeply but less frequently (1–2 inches per week) to avoid soggy soil.
- Plant tomatoes in raised beds or containers for better drainage.
- Avoid overhead irrigation—use drip lines or soaker hoses instead.
This fungal disease causes tiny black spots with yellow borders and thrives in wet foliage. Here’s how to clean it up and keep it from coming back:
🔪 Prune & Disinfect Religiously
- Step 1: Remove all infected leaves (even small spots) and sterilize pruners between cuts.
- Step 2: Space plants wider (2–3 feet apart) to improve airflow.
- Step 3: Avoid wetting leaves—water at the soil level only.
🍅 Boost Plant Health with Proper Care
- Fertilize lightly with a balanced 10-10-10 or compost tea to strengthen plants.
- Side-dress with aged compost to improve soil health and resistance.
- 🎯 Pro Tip: Rotate crops—don’t plant tomatoes or peppers in the same spot next year. ✨
🌡️ Use Preventative Sprays
- Copper fungicide (applied every 2 weeks) is the best organic preventative.
- Baking soda spray (1 tbsp baking soda + 1 tsp oil + 1 gallon water) can help prevent new infections.
If your tomato leaves are yellowing with black spots but no fungus is present, the issue is likely overwatering, nutrient deficiency, or poor drainage. Here’s how to revive your plants:
💧 Adjust Watering Practices
- Check soil moisture before watering—stick your finger 1–2 inches deep.
Water only if dry. - Use well-draining soil (mix in perlite or sand if your soil is clay-heavy). - 🔥 Pro Tip: Yellow leaves on lower stems often mean overwatering—let the soil dry slightly between waterings.
💪 Feed with the Right Nutrients
- Yellow leaves with green veins? → Nitrogen deficiency → Use fish emulsion or compost tea.
- Blackened edges on leaves? → Calcium deficiency (blossom end rot) → Sprinkle crushed eggshells or use calcium nitrate.
- Pale yellow leaves? → Magnesium deficiency → Apply Epsom salt (1 tbsp per gallon of water).
🌱 Improve Soil & Plant Support
- Add organic matter (compost or aged manure) to revitalize soil.
- Stake or cage tomato plants to prevent crowding and improve airflow.
- 🌡️ Pro Tip: Mulch with straw to retain moisture and regulate soil temperature. 🌿
Once your plants are back on track, stop the problem before it starts with these long-term strategies:
✅ Rotate crops—don’t plant tomatoes, peppers, or potatoes in the same spot for 3+ years. ✅ Start with disease-resistant varieties (e.g., ‘Mountain Merit’, ‘Defiant PhR’, ‘Jet Star’). ✅ Plant in full sun (6–8 hours/day)—weak, shaded plants are more susceptible. ✅ Sterilize tools & containers between growing seasons (bleach solution works). ✅ Monitor weather forecasts—avoid planting tomatoes in cool, wet springs (late blight’s favorite conditions). ✅ Use row covers early in the season to block fungal spores from the air.
By following these targeted solutions, you’ll not only save your current tomato crop but also protect future plants from these common issues. Happy gardening—and here’s to a bountiful, blight-free harvest! 🍅🌱
Frequently asked questions
Why do my tomato leaves turn yellow with black spots first on the bottom?
This is classic early blight behavior! Fungal spores land on lower leaves (closest to soil/splashing water) and create target-like black spots with yellow halos. The disease spreads upward as spores splash during watering or rain. Check leaf undersides—you’ll often see concentric rings there first.
Can I still eat tomatoes from plants with black spots?
It depends! If spots are only on leaves (not stems/fruit), the tomatoes may still be safe. For early blight, harvest ripe fruit immediately—peel and cook if possible. But if you see late blight (greasy black spots spreading fast), remove all fruit from infected plants.
Will pruning infected leaves help or make it worse?
Pruning helps dramatically—just do it right! Remove only infected leaves (with stems) using sterilized scissors (rubbing alcohol between cuts). Never compost these leaves—burn or trash them to prevent spore spread. Focus on lower leaves first where fungi start.
How often should I spray fungicide for prevention?
For prevention, spray every 7–10 days starting when plants are 6 inches tall. Use copper fungicide or baking soda mix (1 tbsp baking soda + 1 tsp soap per gallon). Apply at dawn or dusk to avoid leaf burn. If you see spots, switch to every 5–7 days until new growth appears.
Why does my tomato plant have black spots but no yellowing?
This could be heat stress (blackened edges from scorching) or pest damage (like spider mites). Check for dry, crispy spots (heat) or tiny webs/stippling (mites). If spots are soft and wet-looking, it might be bacterial spot—remove affected leaves immediately and use copper fungicide.