
Plants
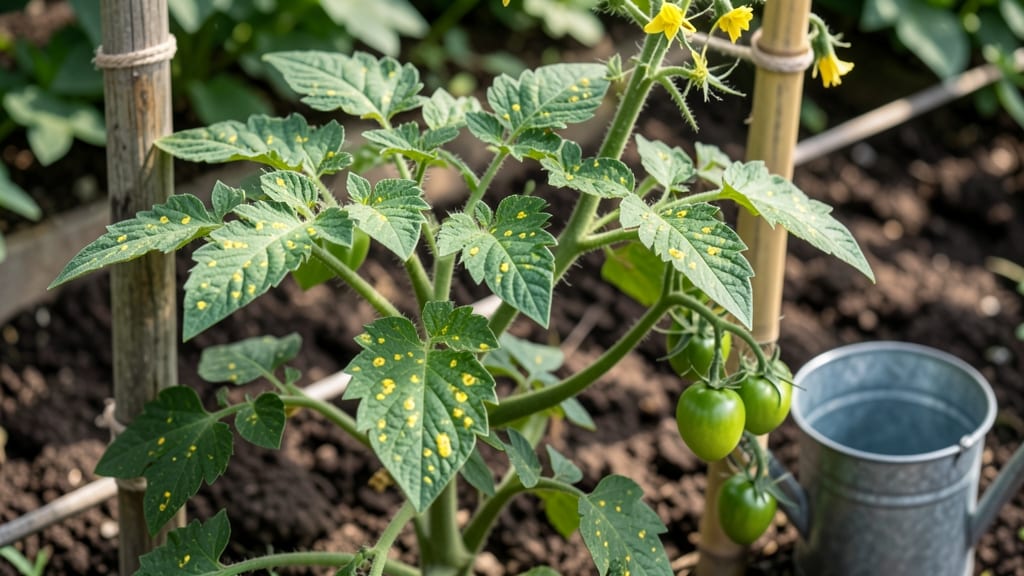
Yellow spots on tomato leaves mean your plants are silently screaming for help—and the longer you wait, the worse it gets. 🌱 I’ve watched entire crops spiral from a few spots to total collapse in just two weeks, but this simple 3-step process stops it dead in its tracks before your harvest suffers.
The spots could be fungal (like early blight’s concentric rings), bacterial (tiny, water-soaked marks), or even sunburn from too much afternoon heat.
The key is checking the undersides of leaves and the pattern: fungal spots spread with brown edges, bacterial spots ooze, and nutrient issues show as uniform yellowing between veins. I’ll show you how to tell them apart in seconds.
With the right fix—whether it’s copper spray for bacteria, neem oil for fungus, or adjusting your watering—you’ll see new growth within 7-10 days. The plants stop struggling, the spots fade, and you keep that juicy, homegrown tomato future intact.
No guesswork, no expensive treatments: just the foolproof steps I use every season to save my plants—and my sanity. Let’s get those leaves looking healthy again.
Root Causes Behind Yellow Spots
Yellow spots on tomato plant leaves are rarely a single issue—most often, they’re a cry for help from your plant, signaling stress from one or more underlying problems. Understanding these causes is the first step to saving your harvest.
Below, we break down the most common culprits, their scientific triggers, and how they manifest in your garden.
---
Fungal infections are the #1 reason for yellow spots on tomato leaves, often accompanied by powdery mildew, early blight, or septoria leaf spot. These pathogens thrive in humid, stagnant conditions and spread via spores.
- **Early Blight (Alternaria solani) - How it starts: Spores land on lower leaves, creating concentric rings of yellow/brown spots with dark borders.
Over time, leaves crisp and drop. - Why it spreads: Poor air circulation, overhead watering, and wet foliage (especially at night). - Red flag: Spots often appear first on older, lower leaves and move upward.
- Septoria Leaf Spot (Septoria lycopersici) - How it starts: Tiny dark speckles with yellow halos appear, often with gray centers.
Severe cases cause leaf drop. - Why it spreads: Cool, wet weather (60–80°F) and contaminated soil or tools. - Red flag: Spots are smaller than early blight but multiply rapidly in shaded, damp areas.
- Powdery Mildew (Oidium spp.) - How it starts: White, powdery patches on upper leaves turn yellow as the fungus blocks sunlight. - Why it spreads: High humidity + low light (e.g., crowded plants or shade). - Red flag: Leaves may yellow entirely before curling or dying.
--- Bacteria cause water-soaked spots that turn yellow or brown, often with slime or foul odors. Unlike fungi, they spread via contaminated tools, water, or insects.
- Bacterial Spot (Xanthomonas perforans or Pseudomonas syringae) - How it starts: Small, greasy yellow spots with watery centers that enlarge and turn brown.
Leaves may develop shot-hole punches. - Why it spreads: Overhead irrigation, contaminated pruners, or infected plant debris. - Red flag: Spots appear within days of wet conditions, especially in warm (75–90°F) weather.
- Bacterial Leaf Spot (Pseudomonas spp.) - How it starts: Irregular yellow-brown spots with yellow borders, often on young leaves. - Why it spreads: Splashing water from rain or irrigation. - Red flag: Leaves may yellow and drop prematurely, stunting plant growth.
--- Yellow spots can also signal mineral imbalances, often confused for disease. Unlike pathogens, these issues start on older leaves (for mobile nutrients) or new growth (for immobile ones).
| Nutrient | Yellow Spot Location | Other Symptoms | Cause | |---------------------|--------------------------------|--------------------------------------------|-------------------------------------------| | Nitrogen (N) | Lower leaves, pale yellow | Stunted growth, weak stems | Poor soil, overwatering, or leaching | | Magnesium (Mg) | Between leaf veins (interveinal chlorosis) | Older leaves yellow first, veins stay green | Compacted soil, high pH, or over-fertilizing with N | | Potassium (K) | Leaf edges (scorch-like) | Weak stems, poor fruit development | Sandy soil, overwatering, or K deficiency | | Iron (Fe) | Young leaves, bright yellow | Small leaves, stunted growth | Alkaline soil (pH >7.0) or waterlogged roots |
--- Sometimes, yellow spots are not infectious but a response to physical damage or extreme conditions.
- Sunburn or Heat Stress - How it happens: Sudden heat waves (above 90°F) or intense sunlight (e.g., after transplanting) cause bleached or yellow patches on exposed leaves. - Red flag: Spots appear on upper leaves first, often with crispy edges.
- Overwatering or Poor Drainage - How it happens: Root rot** (from Fusarium or Phytophthora) causes yellowing between veins, wilting, and blackened stems. - Red flag: Soil stays soggy for days, and plants pull away from the pot.
- Underwatering or Salt Buildup - How it happens: Dry, crunchy yellow edges (from osmotic stress) or white crust on soil surface (salt accumulation). - Red flag: Leaves curl upward and feel papery.
--- Chewing insects and mechanical damage can create yellow spots as the plant’s immune response.
- Spider Mites or Aphids - How it starts: Tiny yellow stipples (from feeding) turn into bronze or necrotic spots. - Red flag: Fine webbing on undersides of leaves or sticky honeydew on lower leaves.
- Hail or Wind Damage - How it happens: Irregular yellow patches from crushed cells after physical trauma. - Red flag: Spots appear suddenly after storms, with no fungal/bacterial signs.
--- Over-fertilizing (especially with nitrogen or salts) or herbicide drift can cause yellowing with no other symptoms.
- Fertilizer Burn - How it happens: Yellow/brown spots on leaf edges or tips from excess salt in soil. - Red flag: Soil crusts when dry, and plants wilting despite water.
- Herbicide Drift - How it happens: Bleached or yellow patches on leaves exposed to glyphosate or 2,4-D. - Red flag: Spots appear within hours/days of drift, with no other plant stress signs.
--- Pro Tip: 💡 Isolate suspicious plants before diagnosing—some diseases (like bacterial spot) spread within 48 hours. Use a hand lens to check for spores, slime, or pests to narrow down the cause.
Fixing Yellow Spots on Tomato Leaves
Now that you’ve identified the root cause of those pesky yellow spots on your tomato plant leaves, it’s time to roll up your sleeves and get to work! 🌱🔧 The good news? Most issues are fixable with simple, garden-friendly solutions.
Below, we’ve mapped out practical fixes for each common cause, along with prevention tips to keep your tomatoes thriving. Let’s turn those sad, spotted leaves into lush, productive foliage!
---
Fix: Adjust your watering habits and improve soil aeration. - 🔥 Step 1: Let the Soil Dry Out Water only when the top 1–2 inches of soil feel dry to the touch. Stick your finger in—if it’s damp, wait another day. Overwatering suffocates roots and invites fungal diseases.
Pro Tip: 💡 Use a moisture meter for accuracy, especially in containers or heavy clay soil.
- 🍳 Step 2: Enhance Soil Drainage Amend your soil with perlite, vermiculite, or coarse sand (10–20% of the soil mix) to improve airflow. For potted tomatoes, ensure pots have drainage holes and elevate them slightly off the ground.
- ⏰ Step 3: Water Deeply but Less Often Instead of light, frequent watering, give your tomatoes a slow, deep drink (1–2 inches per week) early in the day. This encourages strong root growth and reduces surface moisture where fungi love to hide.
Prevention: - Mulch around the base with straw or wood chips to retain moisture evenly and prevent soil splashing onto leaves. - Avoid watering overhead—use drip irrigation or a soaker hose instead.
---
Fix: Isolate the plant, treat with fungicides, and improve airflow. - 👨🍳 Step 1: Prune and Remove Affected Leaves Snip off yellow or spotted leaves (don’t compost them—dispose of them in the trash). Sterilize your pruners with rubbing alcohol between cuts to prevent spreading spores.
- 🥘 Step 2: Apply a Fungicide Use copper-based sprays (like Cupric Hydroxide) or neem oil (1 tbsp per gallon of water) every 7–10 days for prevention. For severe cases, try baking soda spray (1 tsp baking soda + 1 tbsp oil + 1 quart water + a drop of dish soap).
Pro Tip: 🌡️ Apply fungicides early in the morning or late afternoon to avoid burning leaves in direct sunlight.
- 🔪 Step 3: Improve Air Circulation Space plants 18–24 inches apart and stake or cage tomatoes to keep foliage upright. Avoid crowding, which traps humidity and spreads disease.
Prevention: - Rotate crops yearly—don’t plant tomatoes in the same spot where nightshades (peppers, eggplants) grew last year. - Water at the base of the plant, never the leaves. - Choose disease-resistant varieties (e.g., ‘Mountain Merit’ or ‘Defiant PhR’).
---
Fix: Trap, remove, and deter pests naturally. - 🔥 Step 1: Blast Off Pests with Water Spray leaves with a strong stream of water to dislodge aphids or mites. Do this in the early morning so leaves dry quickly.
- 🍳 Step 2: Introduce Beneficial Insects Release ladybugs, lacewings, or predatory mites (available at garden centers) to eat pests for you. They’re the ultimate organic pest control!
- 🥘 Step 3: Use Insecticidal Soap or Oil Mix 1 tbsp mild dish soap + 1 quart water and spray directly on pests (avoid hot days—it can burn leaves). For stubborn mites, try horticultural oil (follow label instructions).
Prevention: - 💡 Inspect new plants before bringing them home—quarantine them for a week if possible. - 🎯 Plant companion flowers like marigolds or basil nearby to repel pests. - ✨ Wrap sticky traps around the plant to catch flying insects.
---
Fix: Feed your tomatoes the right nutrients. - 📊 Step 1: Test Your Soil Grab a DIY soil test kit (or send a sample to a local extension office) to confirm deficiencies. Yellowing often signals low nitrogen (lower leaves) or magnesium/iron (younger leaves).
- 💪 Step 2: Fertilize Correctly - For nitrogen: Use a balanced fertilizer (10-10-10) or fish emulsion (follow package rates). - For magnesium: Sprinkle Epsom salt (1 tbsp per gallon of water) every 2 weeks. - For iron: Apply chelated iron supplement or use iron sulfate (dissolve 1 tsp in a gallon of water).
Pro Tip: 🥗 Avoid over-fertilizing—too much salt can harm roots. Always water before fertilizing!
- 🍎 Step 3: Improve Soil Health Add compost or well-rotted manure to replenish organic matter. For container plants, repot into fresh soil every season.
Prevention: - 🌱 Rotate crops to prevent nutrient depletion. - 🔄 Mulch with compost to slowly release nutrients. - ✨ Avoid synthetic fertilizers—opt for organic options like worm castings or seaweed extract.
--- Fix: Shield your tomatoes from scorching conditions. - 🌿 Step 1: Provide Afternoon Shade Use shade cloth (30–50%) or a lightweight row cover during peak sun (1–4 PM). Alternatively, plant tomatoes near tall crops (like corn) for natural shade.
- 💦 Step 2: Increase Watering Frequency In temperatures above 90°F (32°C), water twice daily—once in the morning and once in the late afternoon. Use mulch to retain moisture.
- 🥗 Step 3: Adjust Plant Placement If growing in containers, move pots to a shadier spot temporarily. For in-ground plants, consider whitewashing the stakes to reflect sunlight.
Prevention: - 🌱 Choose heat-tolerant varieties like ‘Solar Fire’ or ‘Heatmaster’. - 🎯 Plant in spring or fall to avoid peak summer heat. - ✨ Use reflective mulch (like silver plastic) to deflect sunlight.
Frequently asked questions
Why do my tomato leaves have yellow spots only on the bottom?
Bottom leaves with yellow spots usually indicate fungal diseases like early blight or septoria leaf spot. These pathogens thrive on older leaves first. Check for concentric rings or dark speckles—if present, improve airflow and use copper fungicide.
Can I still eat tomatoes if the leaves have yellow spots?
Yes, but only if the spots are from nutrient deficiencies or environmental stress (like sunburn). If spots come from fungal/bacterial infections, remove heavily affected leaves and wash tomatoes thoroughly before eating.
How do I tell if yellow spots are from overwatering vs. disease?
Overwatering causes uniform yellowing between veins with soggy soil and blackened stems. Disease spots have distinct patterns (rings, speckles) and often appear on older leaves first. Check soil moisture—if it's damp for days, it's likely overwatering.
Will pruning yellow leaves help my tomato plant recover?
Prune only the yellow/spotted leaves (never more than 1/3 of the plant at once) to redirect energy to healthy growth. Sterilize pruners with rubbing alcohol between cuts to prevent spreading disease.