
How To
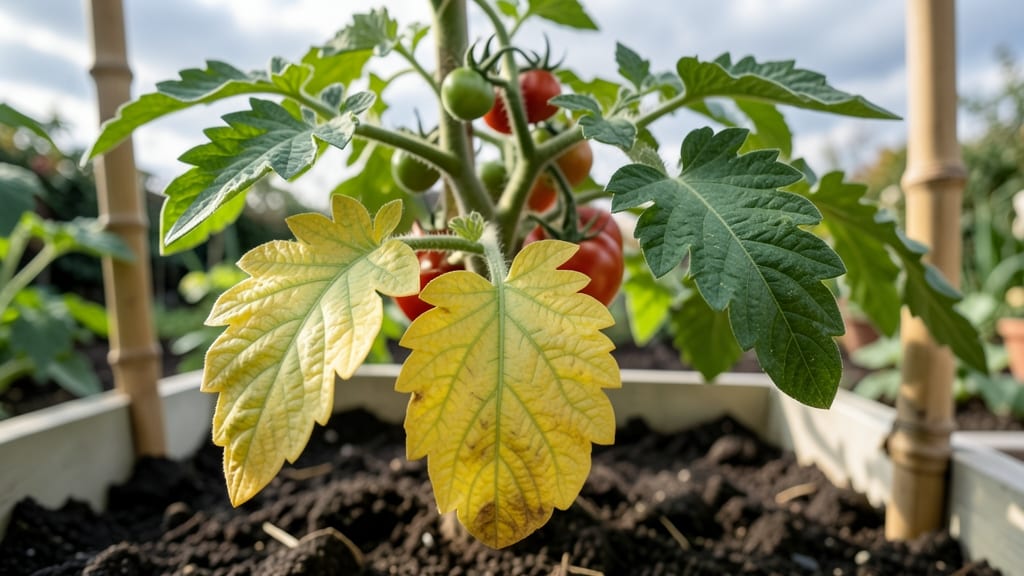
Your tomato plants' bottom leaves turning yellow isn’t just unsightly—it’s a cry for help. 🌱 I’ve seen this "bottom leaf blight" ruin harvests when ignored, but the fix is faster than you’d think. The problem? Overwatering, nutrient starvation, or hidden pests—all solvable with the right tweaks.
Most gardeners overwater without realizing it—soggy soil suffocates roots and turns leaves yellow. Check soil moisture by sticking your finger 1-2 inches down; if damp, hold off. Nutrient issues?
A balanced fertilizer or Epsom salt (for magnesium) works wonders. And those pesky pests? A strong spray of water or neem oil often does the trick.
Within 7-10 days of adjusting care, you’ll see fresh green leaves pushing up from the stem. Prune the worst yellowed leaves to redirect energy, and keep soil moist but never soggy. The key is acting fast—before the problem climbs higher.
If yellowing spreads upward or you see black spots, it’s time for a closer look—sometimes it’s a fungal infection needing a copper fungicide. But in most cases, this fix is simple, quick, and saves your harvest before it’s too late.
Root Causes Of Leaf Discoloration
When your tomato plants start showing yellowing at the bottom leaves, it’s often a cry for help—your plants are trying to tell you something’s off. Understanding the why behind this symptom is the first step to saving your harvest.
Below, we break down the most common culprits, backed by science, so you can diagnose and act fast.
Tomatoes thrive in well-drained soil, but when roots sit in soggy conditions, they suffocate. Overwatering or compacted soil forces roots to struggle for oxygen, leading to:
- Nutrient uptake failure: Roots can’t absorb water or minerals, causing older (bottom) leaves to yellow first as the plant prioritizes new growth.
- Fungal infections: Waterlogged soil breeds Pythium or Phytophthora, pathogens that rot roots and block nutrient flow.
- Chlorosis: A lack of iron (common in waterlogged soil) turns leaves pale yellow, especially between veins.
Actionable fix: Test your soil’s drainage—dig a hole, fill it with water, and time how long it takes to drain. If it’s slower than 4 hours, amend soil with perlite or sand. Pro tip: 💡 Use raised beds or containers with drainage holes to prevent future soggy roots.
Bottom leaves yellowing often signals a mobile nutrient deficiency—meaning the plant moves these nutrients from older leaves to newer ones. The most likely suspects:
| Nutrient | Symptoms | Cause |
|---|---|---|
| Nitrogen (N) | Uniform yellowing (no green veins) starting at the bottom. | Leached soil, overwatering, or lack of organic matter. |
| Magnesium (Mg) | Yellowing between veins (interveinal chlorosis), starting at older leaves. | Over-fertilization with nitrogen, acidic soil, or poor root health. |
| Potassium (K) | Yellowing with brown edges or "scorch" on bottom leaves. | Leaching, improper fertilizer ratios, or drought stress. |
Actionable fix: Conduct a soil test to confirm deficiencies. For quick relief, use Epsom salt (magnesium sulfate) for Mg deficiency (1 tbsp/gallon of water, applied to soil), or a balanced fertilizer (10-10-10) for nitrogen. Pro tip: 🌡️ Avoid over-fertilizing—too much salt can burn roots!
While overwatering gets more attention, drought stress is a sneaky culprit. Tomato roots are deep but sensitive—when soil dries out:
- Transpiration outpaces absorption: Leaves lose water faster than roots can supply it, causing wilting and yellowing.
- Root damage: Severe drought can kill fine root hairs, reducing the plant’s ability to uptake water and nutrients.
- Heat scorch: High temperatures (above 90°F) combined with dry soil lead to oxidative stress, turning leaves yellow and crispy.
Actionable fix: Check soil moisture 1–2 inches deep—it should feel like a damp sponge. Water deeply 1–2 times per week (depending on climate), aiming for the roots, not the leaves. Pro tip: ✨ Mulch with straw or wood chips to retain moisture and regulate soil temperature.
Hidden invaders can drain your tomato’s vitality, leading to yellowing. The most damaging offenders:
- Root-knot nematodes: Microscopic worms that burrow into roots, disrupting nutrient flow. Look for galls (lumpy roots) when uprooting.
- Fungal diseases (Early Blight, Verticillium Wilt): These pathogens clog xylem vessels, blocking water and nutrient transport. Yellowing often accompanies wilting or dark spots.
- Aphids or spider mites: These sap-suckers weaken plants, causing yellowing and stunted growth. Check undersides of leaves for tiny webs or clusters.
Actionable fix:
- For nematodes: Rotate crops and apply neem oil or marigold companion plants to deter them.
- For fungi: Remove infected leaves immediately and apply copper fungicide. Avoid overhead watering.
- For pests: Spray with soapy water (1 tsp mild soap + 1 quart water) or introduce ladybugs for natural control.
Tomatoes are sensitive to their surroundings. Sudden changes in:
- Temperature: Night temps below 50°F or day temps above 95°F disrupt photosynthesis.
- Light exposure: Too little light (shady spots) leads to weak, yellowing leaves.
- Wind or physical damage: Bruised leaves or constant buffeting can’t photosynthesize efficiently.
Actionable fix: Monitor your microclimate. Use row covers for frost protection or shade cloth (30%) in scorching heat. Relocate plants if they’re in a drafty or overly shaded area. Pro tip: 🎯 Stake or cage tomato plants to prevent wind damage and improve airflow.
Revive Your Tomatoes Fast
Now that you know the culprits behind your tomato plant’s yellowing bottom leaves, it’s time to take action! The good news? Most fixes are simple, cost-effective, and can save your harvest. Below, we’ve mapped out targeted solutions for each common cause—plus prevention tips to keep your plants thriving.
Fix it fast:
- 🔥 Step 1: Let the Soil Dry Out Stop watering immediately if the soil is soggy. Stick your finger 1-2 inches deep—if it’s damp, wait. Tomato roots need well-drained soil to breathe. Water only when the top 1 inch feels dry to the touch.
- 🍳 Step 2: Improve Drainage Amend heavy clay soil with compost, perlite, or coarse sand (50/50 mix). If potted, ensure pots have drainage holes and use a well-draining potting mix (avoid garden soil).
- 👨🍳 Step 3: Adjust Watering Habits Water deeply but less frequently—aim for 1-1.5 inches per week (including rain). Use drip irrigation or soaker hoses to deliver water at the base, not the leaves, to prevent fungal issues.
💡 Prevention Tip:
- Test your soil’s moisture before watering—overwatering is the #1 killer of tomato plants! Mulch with straw or wood chips to retain moisture and regulate temperature.
Fix it fast:
- 🥘 Step 1: Hydrate Deeply Give your plant a slow, deep watering at the base. Use a watering wand or hose with a gentle spray to avoid shocking the roots. Repeat every 2-3 days in extreme heat.
- 🌡️ Step 2: Provide Shade (Temporarily) If temperatures exceed 90°F (32°C), shield plants with shade cloth (30-50%) or a lightweight row cover during peak sun (10 AM–4 PM). Avoid plastic, which traps heat.
- ⏰ Step 3: Water Early or Late Water before 10 AM or after 6 PM to reduce evaporation. Morning watering also gives leaves time to dry, preventing fungal growth.
💡 Prevention Tip:
- Mulch heavily (3-4 inches) with straw or grass clippings to lock in moisture. Group plants together to create a microclimate that retains humidity.
Fix it fast:
- 🔪 Step 1: Prune & Remove Infected Leaves Snip off yellow or spotted leaves (don’t compost them—dispose in a sealed bag). Use sterilized pruners (wipe with rubbing alcohol) to avoid spreading spores.
- 🌿 Step 2: Apply Fungicide Spray with a copper-based fungicide (like Copper Soap) or a baking soda mix (1 tsp baking soda + 1 quart water + a drop of dish soap). Reapply every 7-10 days or after rain.
- 🌧️ Step 3: Improve Airflow Space plants 18-24 inches apart and prune suckers to encourage airflow. Avoid overhead watering—use a soaker hose instead.
💡 Prevention Tip:
- Rotate crops yearly—don’t plant tomatoes in the same spot. Solarize soil in late summer (cover with clear plastic for 4-6 weeks) to kill fungal spores.
Fix it fast:
- 💦 Step 1: Blast Off Pests Spray plants with a strong stream of water to knock off aphids or mites. Repeat every 2-3 days for severe infestations.
- 🌿 Step 2: Use Natural Repellents - Neem oil spray (1 tbsp neem oil + 1 tsp mild soap + 1 quart water).
Spray early morning or evening (avoid direct sun). - Insecticidal soap (follow label instructions). - Introduce beneficial insects: Ladybugs, lacewings, or predatory mites eat pests naturally.
- 🍎 Step 3: Remove Heavy Infestations For bad cases, treat with pyrethrin-based spray (organic) or spinosad (like Captain Jack’s). Reapply as needed.
💡 Prevention Tip:
- Inspect new plants before bringing them home. Yellow sticky traps near plants can catch flying pests early.
Fix it fast:
- 📊 Step 1: Test Your Soil Grab a DIY soil test kit (or send a sample to your local extension office) to confirm deficiencies. Common issues:
- Yellow lower leaves: Likely nitrogen (N) deficiency.
- Yellow with green veins: Magnesium (Mg) or iron (Fe) deficiency.
- 💪 Step 2: Fertilize Correctly - For nitrogen: Use fish emulsion (5-5-5) or compost tea.
Apply every 2-3 weeks during growing season. - For magnesium: Sprinkle Epsom salt (1 tbsp per gallon of water) every 2 weeks. - For iron: Use a chelated iron supplement (like Iron Chelate) and apply to dry soil (not leaves).
- 🥗 Step 3: Boost Microbes Add worm castings or mycorrhizal fungi to improve nutrient uptake. Avoid synthetic fertilizers, which can burn roots.
💡 Prevention Tip:
- Side-dress plants with compost mid-season (bury it 2 inches deep, 6 inches from the stem) for a slow-release boost.
If your plant is severely diseased, pest-ridden, or root-bound, it may be beyond saving. Don’t waste time—start fresh!
- Repot if roots are circling (use a 1-gallon larger container).
- Replace if fungal disease has spread to the stem or fruit.
- Save seeds from healthy tomatoes for next season!
✨ Pro Tip: Keep a plant journal! Note watering, fertilizing, and pest issues to spot patterns and adjust care next time. Happy gardening—your tomatoes will bounce back! 🍅🌿
Frequently asked questions about tomato leaf yellowing
Why do tomato leaves turn yellow at the bottom first?
Tomatoes follow a survival strategy called senescence, where older leaves (at the bottom) yellow first to redirect nutrients to new growth. This is normal aging, but if it spreads upward or appears with other symptoms (like spots or wilting), check for overwatering, nutrient deficiencies, or disease.
Is Epsom salt safe for tomato plants with yellow leaves?
Yes, but only if your plants show magnesium deficiency (yellowing between veins). Mix 1 tablespoon of Epsom salt per gallon of water and apply to soil every 2 weeks. Avoid overuse—too much can cause salt buildup and root damage. For nitrogen issues, use a balanced fertilizer instead.
How do I tell if yellow leaves are from overwatering vs. underwatering?
Check the soil: If it's soggy or smells like rot, you're overwatering. Yellow leaves will be soft, limp, and often accompanied by fungal spots. If the soil is bone-dry and leaves feel crispy, it's underwatering. Water deeply at the base when the top 1 inch feels dry.
Can I still harvest tomatoes if the leaves are yellow?
Yellow leaves don’t affect fruit quality unless the plant is severely stressed. Focus on removing only the worst yellowed leaves (especially diseased ones) to redirect energy to fruit production. If the plant is otherwise healthy, your tomatoes will still ripen normally.
What’s the fastest way to fix yellow leaves from nutrient deficiency?
For nitrogen, use fish emulsion (5-5-5) immediately. For magnesium, apply Epsom salt solution directly to soil. For iron, use a chelated iron supplement. Results appear within 7-10 days if the deficiency isn’t severe. Always water thoroughly after applying amendments.