How To
Tomato seeds not germinating can feel like a gut-punch after all that careful planting—especially when you've got 6 weeks until your last frost and nothing's sprouting. 🌱 I've stared at dozens of empty seed trays, wondering if I'd just wasted my money, only to realize the real culprit was something simple I overlooked.
The good news? Most germination failures come down to just three factors: moisture, temperature, or seed quality—and all of them have easy fixes.
Here's the thing—tomato seeds need warmth to wake up, and they need it consistently. Too-cold soil (below 70°F) shuts them down, while uneven moisture can dry them out before they even start.
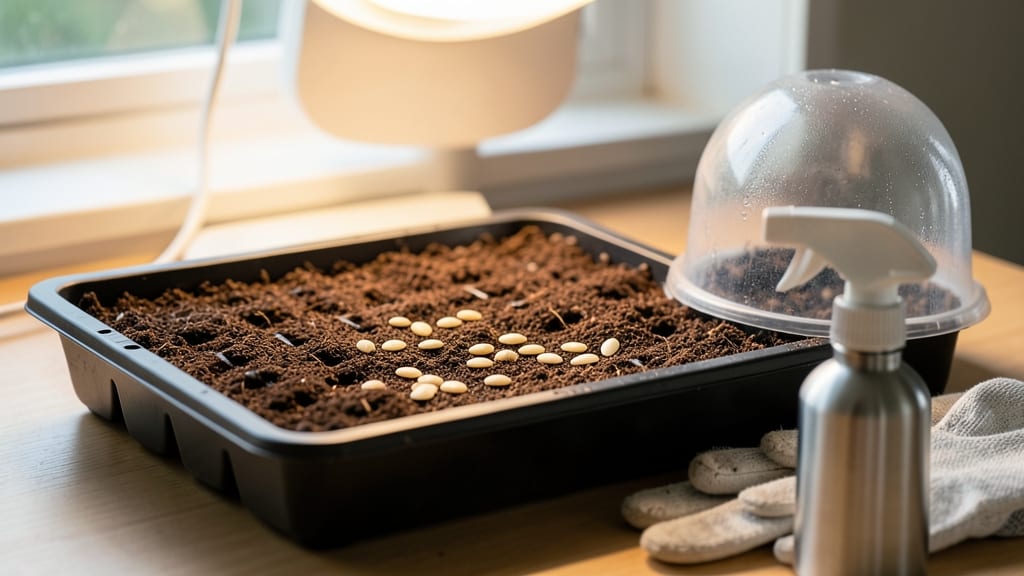
I learned this the hard way when my first batch of seeds sat in a drafty basement, where the temp fluctuated like a rollercoaster. The solution? A heat mat ($15 at garden centers) or a sunny windowsill with a clear plastic dome to trap humidity.
Once you nail those two basics, you're halfway to success.
What you'll end up with is a tray of uniform, sturdy seedlings that outpace anything from the nursery—if you've ever struggled with leggy, weak starts, this method changes everything.
The key is testing your seeds first (drop them in water: if they sink, they're viable; if they float, toss them) and keeping conditions predictable. No more guessing games or wasted seed packets.
This works for heirlooms, hybrids, or cherry tomatoes alike—just adjust your heat source based on your space. Whether you're growing on a kitchen counter or in a greenhouse, these fixes turn stubborn seeds into reliable starters. Let's get those sprouts going!
The Hidden Barriers Blocking Growth
If your tomato seeds are stubbornly refusing to sprout, the issue likely stems from one (or more) of these science-backed roadblocks. Understanding the root cause is the first step to reviving your garden dreams. Let’s break down the most common culprits—and how they sabotage germination.
Tomato seeds thrive in a consistent warm environment, ideally between 70–85°F (21–29°C). Outside this range, enzymatic activity slows or halts entirely, leaving seeds dormant.
- Too Cold? Below 50°F (10°C), seeds enter a state of chilling dormancy, waiting for warmer conditions. If your soil or seed tray is too cool, germination stalls.
- Too Hot? Above 90°F (32°C), seeds can overheat, causing proteins to denature and cell membranes to break down prematurely.
- Solution: Use a seedling heat mat (70°F+) or place trays on top of a fridge (for warmth) until sprouts appear.
Water is the lifeblood of germination, but improper moisture levels can suffocate or dehydrate seeds before they sprout.
- Underwatering: Seeds need constant moisture (like a damp sponge) to activate enzymes that break down stored nutrients. Even brief drying can kill the embryo.
- Overwatering: Excess water displaces oxygen, leading to anaerobic conditions, which produce toxic ethanol and halt growth. Mold or rot may also set in.
- Solution: Use a spray bottle for gentle misting or a seed-starting mat to keep soil evenly moist (not soggy). Aim for 50–70% humidity in the growing environment.
Not all seeds are created equal—some may be too old, improperly stored, or physically damaged, making germination impossible.
- Old Seeds: Tomato seeds lose viability over time. After 4–5 years, germination rates drop below 50%. Check the seed packet for a germination test rate (e.g., 85% means 15% may fail).
- Mechanical Damage: Scratches, cracks, or crushed seeds (from poor handling) can prevent the embryo from accessing nutrients or water.
- Solution: Test a few seeds in a damp paper towel (see our quick viability test) before planting. Store seeds in a cool, dark, dry place (below 40°F/4°C) to extend shelf life.
Most tomato seeds don’t need light to germinate—they rely on stored energy in the seed. However, premature exposure to light or darkness can disrupt the process.
- Too Much Light: While seedlings need light after sprouting, bright light during germination can dry out seeds or trigger photoinhibition, where chlorophyll production halts growth.
- Too Much Darkness: Some seeds (especially hybrid varieties) may struggle if kept in complete darkness for too long, leading to "damping-off" (a fungal disease).
- Solution: Keep seeds in low to moderate light (indirect sunlight or a shaded area) until the first true leaves appear. Use a clear plastic dome to retain humidity without blocking light.
Unseen microbes can consume seeds or seedlings before they even break the soil. Common culprits include Pythium (water mold) and Rhizoctonia (damping-off fungus).
- Signs: Seeds may rot, turn mushy, or develop black, fuzzy growth on the soil surface.
- Causes: Overcrowded seeds, poor airflow, or contaminated soil/potting mix.
- Solution:
- Sterilize soil with a 10-minute bake at 180°F (82°C) or use hydrogen peroxide (3%) as a soil drench.
- Space seeds ¼ inch apart to improve airflow.
- Avoid overwatering and use fungicide-treated seeds if issues persist.
Even with perfect conditions, some tomato varieties (especially hybrids or heirlooms with deep dormancy) may require stratification (a cold treatment) or scarification (nick the seed coat) to break dormancy.
- Hard Seed Coats: Some heirloom tomatoes have thick, waterproof seed coats that block moisture absorption.
- Solution: Nick the seed with a sharp knife or sandpaper, or soak in lukewarm water for 24 hours to soften the coat.
Now that you’ve identified the likely culprit, it’s time to take action! Adjust one variable at a time (temperature, moisture, or light) to pinpoint the fix for your stubborn seeds. 🌱
Revive Your Seeds: Step-by-Step Fixes
Frustrated by seeds that refuse to sprout? Don’t toss them yet—most germination issues have simple, science-backed solutions. Below, we’ve mapped common causes to practical fixes, plus prevention tips to ensure your next batch of tomato seeds takes off like a rocket 🚀. Let’s troubleshoot!
Problem: Seeds lose viability over time (especially after 2–4 years for tomatoes). Poor storage (moisture, heat, or light exposure) can also kill them.
How to Fix It:
- Test viability first: Place 10 seeds between damp paper towels in a sealed bag. Check for sprouts in 5–7 days. If <50% sprout, your batch may be weak.
- Use fresh seeds: Buy new seeds from a reputable supplier (look for a 2024+ harvest date).
- Soak old seeds overnight in warm water (70–80°F) to rehydrate. Drain and plant immediately.
Prevention Tips: ✅ Store seeds in a cool (50–60°F), dry place (airtight container with silica gel packets). ✅ Label seeds with the harvest year to track freshness.
Problem: Too dry = seeds won’t activate; too wet = rot before sprouting. Tomatoes need consistent moisture but not soggy conditions.
How to Fix It:
- Check your medium: Soil or seed-starting mix should feel like a wrung-out sponge—damp but not dripping.
- Bottom-water seeds: Place trays in an inch of water for 10–15 minutes, then drain excess. Avoid overhead watering (which can wash seeds away).
- Use a humidity dome (or plastic wrap) to retain moisture until germination (usually 7–14 days for tomatoes).
Pro Tip: 💡 Mist seeds lightly with a spray bottle if using a soilless mix, but avoid saturation.
Problem: Tomatoes need warmth (70–85°F) to germinate. Cold soil (<50°F) or heat spikes (>90°F) can stall sprouting.
How to Fix It:
- Use a heat mat (70°F) for indoor starts. Place it under seed trays for consistent warmth.
- Move pots to a sunny windowsill (south-facing) or under grow lights (12–16 hours/day).
- Avoid drafts (AC vents, open windows) and extreme heat (like a sunny car).
Prevention Tips: ✨ Pre-warm soil by soaking trays in hot (not boiling) water for 10 minutes before planting. ✨ Monitor with a thermometer—cheap digital ones work!
Problem: Dense, nutrient-poor, or compacted soil suffocates seeds. Tomatoes need loose, well-draining mixes.
How to Fix It:
- Use a seed-starting mix (not garden soil—it’s too heavy). Add perlite or vermiculite (20%) for aeration.
- Loosen the mix with a fork or your fingers before planting. Seeds should sit ½ inch deep in fluffy soil.
- Avoid pressing down after planting—gently pat the surface to ensure contact with moisture.
Table: DIY Seed Mix Recipe
| Ingredient | Ratio | Purpose |
|---|---|---|
| Seed-starting mix | 70% | Lightweight, sterile base |
| Perlite/vermiculite | 20% | Improves drainage |
| Coco coir | 10% | Retains moisture |
Problem: Tomatoes need just the right depth—too shallow = dries out; too deep = struggles to break through.
How to Fix It:
- Ideal depth: ¼ to ½ inch below soil surface. Use a toothpick to mark planting lines if needed.
- For tiny seeds: Mix with a little sand or fine perlite before sprinkling to ensure even distribution.
- Press lightly but don’t compact. A gentle water spray helps settle seeds without burying them.
Visual Guide: 👨🍳 Step-by-step planting:
- Fill trays with moist mix.
- Scatter seeds ¼ inch apart (or follow packet spacing).
- Cover with ⅛ inch of mix (use a sieve for evenness).
- Mist with water and label trays!
Problem: Some seeds take longer than expected (up to 3 weeks for heirlooms). Others may look "dead" but are just waiting.
How to Fix It:
- Wait 2–3 weeks before declaring seeds failed. Keep conditions stable (moisture, warmth).
- Check for "peeping" sprouts: A tiny white root or crack in the seed coat means life is there!
- If still nothing: Try the paper towel test (see Fix 1) to confirm viability.
Prevention Tips: 🎯 Start seeds early (6–8 weeks before last frost) to avoid rushing germination. 🔥 Use a germination journal to track progress and adjust conditions.
Final Pro Tip: ✨ Rotate trays daily for even light exposure—seeds leaning toward a window is a sign they’re alive but need more!
With these fixes, your tomato seeds should break through the soil in no time. Next up: transplanting tips to keep those seedlings thriving! 🌱🍅
Frequently asked questions
Why do my tomato seeds stay hard even after weeks of waiting?
Hard seeds often have thick seed coats blocking moisture. Try soaking them in lukewarm water for 24 hours before planting, or gently nick the seed coat with sandpaper or a knife. Some heirloom varieties need this extra step to break dormancy.
Can I use regular potting soil instead of seed-starting mix?
Regular potting soil is too dense and may contain pathogens that rot seeds. Use a lightweight seed-starting mix with 20% perlite or vermiculite for better drainage. This prevents compaction and fungal issues that kill seeds before they sprout.
How do I know if my seeds are still viable before planting?
Do the paper towel test: Place 10 seeds between damp paper towels in a sealed bag. Keep them in a warm (70°F) place for 5–7 days. If 50%+ sprout, your seeds are good to plant. If fewer than half germinate, try soaking old seeds overnight in warm water.
My seeds sprouted but then turned black and mushy—what happened?
This is damping-off, caused by fungal infection from overwatering or poor airflow. Reduce moisture (bottom-water instead of misting) and improve ventilation by spacing seeds ¼ inch apart. Sterilize soil with hydrogen peroxide (3%) or bake it at 180°F for 10 minutes before replanting.